Braze Welding Tutorial.
 Cast Iron Braze Welding.
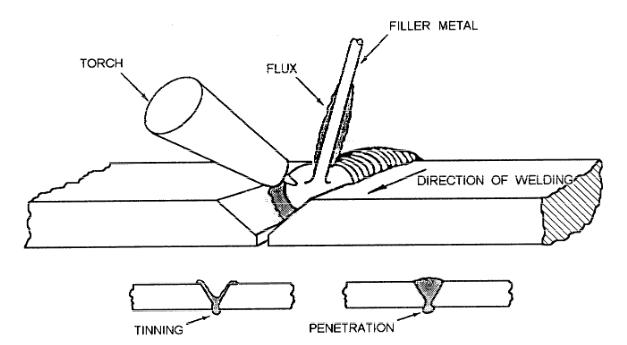
Braze welding (also referred to as bronze welding) and fusion welding are almost the same except for the fact that the base metal is not to be melted. Tinning is used to distribute the filler material.
Braze welding is can make a bond that is as good as using the fusion welding process, but the benefit is that you you will not effect the base metal nearly as much.
Also, you can weld metals that are not the same, unlike fusion welding.
The benefits of braze welding can be summarized like this:
- Weld diffrent types of material together.
- Significantly reduces distortion (warping).
- Reduces or elements the need for preheating.
Fusion welding causes the metal characteristics to change and this can create stresses in the material you are welding. Braze welding nearly elements this problem, which makes it a desirable process for welding big castings.
The problem however, is that it becomes weaker in high temperatures.
Braze Welding Equipment.
This is where brazing and braze welding are similar. You will use the same equipment as you would if you were brazing, but you should probably use an acetylene torch because you'll need more heat.
Filler:
The welding rod used for this process is mainly made up of zinc and copper. There are other trace elements included in the rod to improve flow, deoxidation, and reduce fumes.
The chart below shows you what is included in most rods for the braze process. The choice of rod is dependent upon the base metal you are welding.

Flux:
You must use a flux when braze welding. A flux is used to keep oxides from ruining your weld. The problem is that if your metal has not be cleaned your filler won't bond well because of potential contamination from oxidation. It won't be spread evenly or smoothly resulting in a bad weld. Flux is essential to avoiding this from happening.
You can put flux on the rod or you can put it on the area to be welded. If you use it on the rod you will dip the rend of your rod into the flux after it has been heated.
You can also used welding rods that have flux already on them.
The Process:
Preparation:
As with any weld, the better your edge preparation the better your weld will be. You can read more about preparation here.
If you have thick material to prepare you can file or grind it. Machining is also used for edge and joint preparation. Thin material usually does not need to be prepared, except for cleaning. And when you clean the material you should have the top and bottom cleaned as well.
To remove the most common types of contaminants like oxides, oil, and the various types of grease you can use steel wool. Some fabricators use a file or sometimes sand paper.
Preheating and Tinning:
After your material is clean and you apply flux to the process you'll achieve tinning.
You'll need to get the parts aligned properly. Clamps are always a good choice here, but you can also tack weld your material. Clamps and tack welds are also a good idea depending on what you are welding and what you are wanting to achieve.
Preheating is necessary in to avoid excessive contraction or expansion of the material as you weld. It all depends on what you are welding and how big it is.
After you preheat, tinning occurs. This is where you will need to use an oxidizing flame on your torch, so make that adjustment. After you make this adjustment you will begin the process of fluxing. As you braze weld you'll learn that a strong weld is the result of more flux as the tinning process occurs.
You'll also need to use heat on the base metal. When it turns red you'll want to melt the filler material so that it is evenly spread onto the joint. You may or may not need to increase the filler material.

One of the challengers of braze welding is controlling heat because you don't want the base metal to be too hot or cold. If it become too hot your filler material will run or bubble up. Conversely if the filler rolls off the metal then it needs more heat.
Once you tin the base metal you can apply more filler material and bead it.
This is where you can use your fusion welding skills. You'll add beads just like you were oxy-acetlyene welding by slightly rotating the torch flame (small circles) as you lay beads. However, you'll be adding flux at the same time.
You may find that you'll need to use more than one or two passes. If that is the case then you need to be certain that the second, third, or fourth layers are fused well together.
Finally, you should heat both sides of your weld joint after you finish so that everything cools at the same rate which ensures a better finished product. And once it's cooled you'll need to get rid of any flux or other residue.


Welding Plans:

New! Welding Table
New! Log Splitter
Top Projects:
