Tig Welding Tips and Tricks!

The first thing you need to do when you are TIG welding is be safe:
- Cover yourself up to protect yourself from the UV rays even if you are welding lightly and for a short time. You can buy welding clothing, or you can simply cover up with a cotton shirt.
- If you wear cotton be sure it’s treated to eliminate or reduce the potential of catching fire (combustion). If you have regular garage type clothing like overalls make sure they do not have any gas, oil or grease residue.
- Wear leather gloves.
- Get a full face welding helmet; preferably an autodarkening welding helmet. Set your lens to 10 or adjust it higher or lower depending on your eyes.
Here's Basically How TIG Welding Works:
Tig welding is a beautiful welding process and it’s versatile. You can weld it autogenous, you can butt weld, lap weld, and more difficult welds like fillet welds.
One of the reasons the welds are so good is because your weld is ‘shielded’ from contaminants in the air by gas: argon gas. The argon gas is pushed through your welding torch and this gas then shields or pushes the air from the weld you are creating as well as it keeps your electrode from oxidizing.
When you TIG weld you will strike an arc between your non-consumable electrode and the piece of metal you are welding. As a result the arc creates heat and this makes the edges of the metal you are working on to melt and combine.
The Tig Welding Torch:

Side Bar: You can get both water cooled and air cooled Tig torches.
Often when you are joining pieces of metal together there will not be a
perfect fit. In other words you will have gaps in your work. And this
calls for filler material. Your filler material is going to be in the
form of a filler rod which you will be ‘dabbing’ at the edge of your
weld puddle.

Tig Welding Basics!
TIG Welding, was developed in the 1940’s and it was mostly used in the aircraft industry because they had to weld aluminum and magnesium and TIG was the best procedure to accomplish this.
Initially, helium was used as a shielding gas for TIG. That’s where the term ‘heliarc welding’ comes from. New it’s usually called ‘TIG welding’. TIG stands for Tungsten Inert Gas. The technical term for TIG is actually GTAW welding which stands for Gas Tungsten Arc Welding.
Side Bar: Just to make sure you understand, shielding gas is used to shield the weld from contaminants, namely Oxygen. If Oxygen gets in it will ruin your weld. Argon and helium are the main gas used now, not helium.

The TIG welding process is great for car and truck bodywork, motorcycles, and bikes. But these days a lot of welders use MIG welding for auto bodywork.
MIG welding is a strong and fairly fast process, but the limitations with MIG are that the beads are brittle compared to TIG weld beads.
The problem with this is that if you hammer a MIG weld bead it may break or fracture. Conversely, a TIG bead is softer and you’ll find that if you hammer the bead it won’t fracture or crack.
TIG Tutorial!
The best way to learn TIG welding is to get a piece of metal
and lay some beads without using any filler metal.
For example, this is sixty thousandths mild steel and we’ll run some beads on it.
The main goal in this exercise is to run a bead and keep the
puddle width consistent.
If you go to fast your bead will be narrower, and the more heat you apply the wider your weld bead will be.
Here’s A Good TIG Weld Bead Without Filler:

What you should do is make a lot of these practice runs
without using filler rod. The reason I suggest you don’t use filler rod is
because you’ll get a better feel for hand motion as you TIG weld. You’ll also
get a good feel on how to use the foot pedal.
After you find that you are more comfortable welding without
filler rod, go ahead and add filler rod.
When you add filler rod to your weld you want to get it to
the middle of the weld puddle, but touch the filler rod on the leading edge of
the puddle because the puddle will draw in the filler. You’ll find that you don’t
have to put very much of the rod into your puddle.
As you take the rod away don’t pull it too far back because you want to keep the hot end of the rod right inside the shielding gas envelope.
This Short Video Shows You Good TIG Welding Technique: Lead The Puddle and Dabbing.
2 Tig Welding Tips:
- Hold torch like a pencil, tilt it so you can see what you are doing. You want to push your weld, not pull it.
- You need a ground clamp as close to where you are welding as possible.
Here’s The TIG Weld Bead Using Filler Rod And It Looks Good.
The goal here is to get a uniform width and height:

Now Let’s Try TIG Welding Stainless Steel.
Here are 2 pieces of stainless steel. They are an 8th inch thick, and they’re in a T configuration. What you want to do is clamp it down to your welding table so that it doesn’t move as you begin to add filler rod to it:

Stainless steel welds nicely and it flows very well and typically a weld made on stainless will have a finer and more uniform bead pattern than any other material.

TIG Welding Tubing.
Some of the most interesting and demanding types of joints that you will weld are when you work with tubing, especially if the tubing has complex pieces that need to fit together. This occurs often in the motorcycle, bike, and automotive arena.
It’s always a challenge to get a TIG torch into the little recessed areas of tubing, but it can be done. However it's beyond the scope of this article but I recommend this DVD for more on this.

In situations like this, the gas lens is going to be your best friend because with a gas lens rather than a regular cup you can let the tungsten stick out far enough so that it can fit into that little joint.
This is probably going to be the most difficult joint you’re going to come across. But with some practice you will get very good at it.
Before Welding The Joint:

After Welding The Joint:

Good and Bad Beads:
Too Hot, Too Cold, Or Just Right?
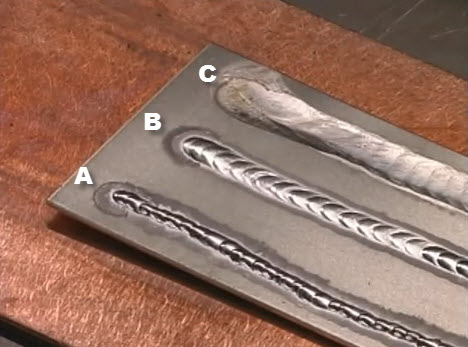
- Bead A: Too cold. It doesn’t flow under the base metal around it. It's more like the bead is resting on top of the metal like a caterpillar. This is a weld that did not have proper heat.
- Bead B: This bead good. It's rounded and you can notice that ripples in the weld bead. It also flows nicely into the metal.
- Bead C: Too much heat. This bead doesn’t have
any definition of the weld bead at all. It's almost flush with the metal.
Filler Rod and Tungsten Contamination!
When the electrode gets contaminated you have a little mess on your hands. Notice the black smudge around this weld:

Here's the problem: when you touch the filler rod to the electrode the filler rod melted and bits of it stick to the tungsten electrode.
If you don't clean this up properly you will not be able to make a good weld.
Some people will not bother with cleaning it up and keep on welding. The problem with this is that this contamination will not make it possible to make a good weld bead.
Recommended:


Welding Plans:

New! Welding Table
New! Log Splitter
Top Projects:
