Collapsible Work Bench!
This collapsible work bench welding project is for the intermediate welder and is perfect for those short on space in their workshop as it allows for a fully functioning work bench that can collapse to create more space when not in use.
This project came about as a friend built a work shop in his garage but still wanted the opportunity to park his car during the winter months. By having a collapsible work bench it meant that he could still park the car without having to remove the work bench within the work shop as it folded neatly out of the way.
As mentioned at the end of the project you can always drill a metal sheet to the wall and weld the collapsible table to the wall to offer a more secure setting. This does mean the table cannot be moved around unless the screws are removed from the wall.
Below is everything you need to know to build your own collapsible workbench through our welding project.
Collapsible Work Bench Welding Project Steps:
Below are all the tools and materials needed to make your collapsible work bench.
- Mig Welder
- Tape Measure
- High gauge metal sheet
- 25.4 mm box section
- Drill and drill bit
- Guillotine or bench shear
- Steel cutting circular saw
- Metal scribe
- 5 metal hinges
- Paint and spray gun
So you have checked the list and have everything that is mentioned above? Well now you are truly ready to start this project.
- The dimensions of this project are: Length 1000 mm Width 500 mm and Height 1000 mm.
- Take your box section and cut four lengths at 1000 mm, these will be the legs of your work bench. Cut another two lengths at 994 mm, these will support your table top and three lengths at 440 mm.
- Now take your metal sheet and mark out 1000 mm by 500 mm and cut out this rectangle, this will be your table top.
- Weld your two 994 mm pieces of box section on to the 440 mm pieces of box section as show in figure 1
- Take your final box section at 440 mm and weld one leg on either side, now weld two hinges on the 440 mm box section just inside each leg.
- Take your work bench top and weld the rectangle created in part 4 under the centre of the table top.
- Now you can weld the table top to the hinges on your legs create earlier.
- Take your last two hinges and weld these to the underside of the table end at either corner facing out of the end so the legs will fold in underneath the table
- Weld your last two box section legs onto the hinges under the table top.
- You should now be the proud owner of a space saving collapsible work bench as shown below
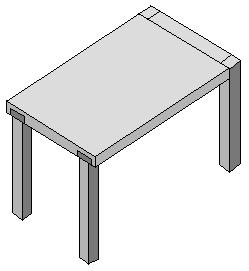 Collapsible Work Bench Collapsible Work Bench |
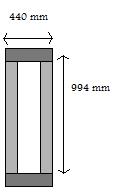 Figure 1 mentioned in part 4. Figure 1 mentioned in part 4. |
The Collapsible work bench welding project is perfect for those with little space to carry out welding, something many hobby welders suffer with. Utilizing this collapsible bench will allow you to carry out work on the bench when required and fold it away to use the open spaces of your work shop when you do not need it.
Note: Many people use the drill and drill bit to drill a small sheet on a wall so they can weld the rear legs to the wall for a wall mounted collapsible workbench. This is a great way of having a secure and strong work bench that still saves space.


Welding Plans:

New! Welding Table
New! Log Splitter
Top Projects:
