Build A Planishing Hammer In Seven Steps!
A planishing hammer is a really good metalworking project for welders. Here's what I'm talking about:
So you have mastered welding and have been welding for some time, through this time you feel you have gained the experience to move you from being a novice welder to that of an intermediate. Now you feel you are an intermediate welder its time for you to take up the mantle and hone your skills further so that, as a welder, you can move to an advanced state and build your own planishing hammer or other shop tools.
Welding is not as easy as one would think and it takes a great amount of time and practice to gain the relevant skills to become an intermediate or advanced welder. In light of this we have took one of the best intermediate welding projects available and wrote a step by step guide on how to build it.
This intermediate welding project is to build your very own tool, this tool is the much talked about planishing hammer.
Build Your Own Planishing Hammer
If you want to improve your welding then there is no better way to do this than to actually build metal working equipment you can use. One tool that will improve your overall metal working is a tool called a planishing hammer which you use to finely shape and smooth out metal. A planish hammer basically combines a frame with an air hammer and an anvil to create a useful tool.
- To build your own planishing hammer you need to cut three pieces of box section about 700 millimeters in length. You then need to cut one end of two lengths at a forty five degree angle and the last length at both ends at a forty five degree angle. You can now join these lengths together to form a C.
- You can now strengthen the C shape by cutting two short pieces of box section and cutting both ends at a forty degree angle on both, these can fit on the inside of the joints as show in the image below.
- Now comes the more intricate parts, firstly we will add the air hammer to the frame by using quarter inch plate and sheet metal. First you take the metal and bender it to a comfortable tube shape that the air hammer fits in. Next you cut two equal sized squares of quarter inch plate and drill two hols on the inside of two corners on each. Now you weld the quarter inch plate on the tube shape you have formed with the holes facing away from the weld.
- Take the air hammer tube just created and weld it to the end of your top arm; you can now place the air hammer inside your tube and then put bolts through the holes created. Once you tighten the bolts your air hammer will be held securely in place as you have just created a clamp for your air hammer.
- Now you want to take a length of tubing and cut this to around forty centimeters in length. This tubing will be welded to the bottom arm of the C to make it look more like a G. This will be used to house your clamp and anvil.
- Take a Band Clamp and use a strip of ¼ inch plate to weld this to the top of the tube. Once done find a smaller diameter tube that will fit neatly within the tube you have welded to the frame.
- Weld a round piece of quarter inch plate that is about 2 cm in diameter wider than the tube on to the top of the inner tube. This will act as your anvil.

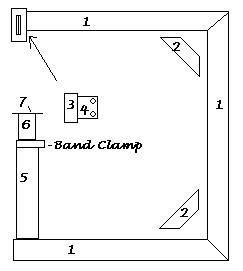
You will now have a planishing hammer similar to the diagram on the right.
You can raise the inner tube (marked 6) with the plate and use the band clamp to hold the inner tube in place so your anvil is set to the right height. Now you can add your work and start up the air hammer so you can use your very own planish hammer.
If you really want to improve the design of your planishing hammer you can do one of the following three options, dependent on your requirements.
- You could weld the planishing hammer to the edge of a welding table to add stability to the hammer.
- You can add feet to the bottom of the frame to add some stability while still allowing for the planishing hammer to be maneuvered around.
- You can use any left over box section to create legs for the planish hammer so it sits as its own entity as your very own home built metal working tool for others to be jealous of.
Now you have completed your first of many intermediate welding projects and you can be proud of the project outcome as you now have your own metal working tool made with your fair hands. The beauty of intermediate welding projects is that they deliver real items that you will get to use time and again.
For more metalworking projects and welding ideas visit this killer resource page of ours.
Related Product Recommendation:
Welding Plans:
New! Welding Table
New! Log Splitter
Top Projects:


