Joint Preparation: How To Prepare Metal For Welding.
In this article on joint preparation we are going to learn how to prepare metal for welding so that you can get the best weld possible.
When do you need to prepare a joint for welding?
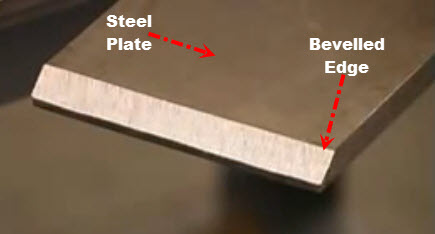
A rule of thumb is to prepare the joint (bevel it) if the plate is 3/16 thick or more.
Some say 1/8 of an inch more.
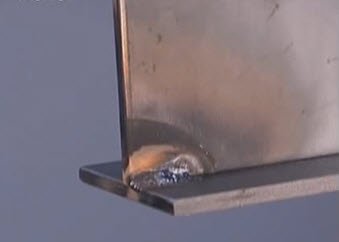
Beveling Not Required:
In the Tee joint image above no beveling was needed. But regardless of the metal thickness you still have to prepare it by cleaning it and removing rust, oxides, mill scale etc.
Warning: When preparing aluminum (or aluminum alloys) do not use sodium hydroxide or any type of cleaner with a pH that is higher than 10 because these types of cleaners will have a chemical reaction. You should research what type of cleaning and or preparation method is proper for each type of metal you are going to work with because some react differently to others and can cause severe health hazards.
Side Bar: we are going to talk about beveling edges because that is the most common way to do joint preparation.
What Is Joint Preparation?
Joint preparation is a more technical term used in the welding industry to describe how you prepare metal for welding.
See, when you weld something you are usually welding two pieces of metal together to form a joint. And unfortunately many welders do very little if any joint preparation. It's very important because it's crucial to achieving a good weld.
If you don't do any joint preparation you will end up with 'tall' welds (meaning they are sticking up more than they are getting closer to being flush with both pieces of metal), and on a more serious note you may get poor fusion.
Side Bar: Ron Covell covers a really cool Plasma cutting technique for beveling edges on thicker material in Tig Welding Basics.
What Is Fusion?
Fusion occurs when your filler metal fusses with your base metal. You get good fusion when the base metal side walls melt and fuse with the molten weld metal (filler metal) you are using to to weld with.
Joint Basics!
As you know by now, any product you weld together must have welded joints, otherwise it's not usable. So when you weld to pieces of metal together you are welding a joint.
The joints that you weld become what is called a 'weldment'. That's a technical term you don't really need to dwell upon, but it's good know know.
And when you weld a joint together you will use your wire or rod (which is your filler metal) to fuse the joint. By the way, the base metal is your metal that you are welding together (or cut).
As we have discussed, how good your joint that you are welding is depends not only on how well you weld it, but how well you prepare it.
Prepare metal well and it will reduce contraction and expansion from cooling and heating. If you do not prepare metal well heat that radiates to the base metal as you weld will be low (or lost) and your base metal will not fuse properly with your filler metal.
Conversely you do not want excessive heat either. There is a balance you are trying to achieve and joint preparation is crucial to achieving it.
The First Step To Joint Preparation:
The first step to preparing metal for welding is to remove all the impurities otherwise your weld will not be
a good one. So remove rust, mill scale, and oxides. If you do not do
this they will get into your weld and ruin it or make it ugly and weak.
Metal edge preparation is crucial in allowing the filler metal and metal edge walls to fuse without too much melting.
As we discussed in the article on the types of joints, there are 5 joints that you will be creating for your projects:
- Butt
- Corner
- Edge
- Lap
- Tee joint
How To Prepare Each Joint:
Butt Joint:
I just want to remind you to read 'the first step' above first...
You can prepare a butt
joint by using several different techniques including using a flame,
chipping, shearing, cutting, and more. For most metal preparation you will use a standard grinder.
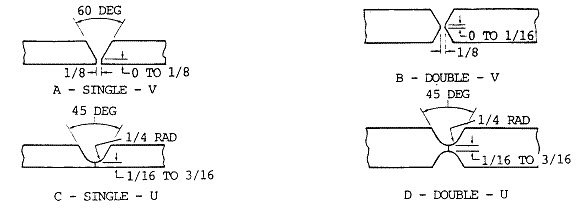
For welding light sheep metal 3/8 of an inch to 1/2 inch plate you can use the single V groove joint or single U groove joint (in other words, the beveled edges look like a V or a U in a cross section view. See second image below)...
Light Section Butt Joint:
Heavy Section V and U Butt Joint Weld:
In the image above, look at B (the Double V Joint, upper right corner). This should be used in plate that is 1/2 of an inch up to 2 inches thick.
If you are going to weld plate that is 3/4 of an inch and up look at the lower right hand corner of the image above (D - Double U Joint). This is the preferred method of joint preparation for this thickness of material.
The reason you want to prepare your metal on both sides (double V or double U) is because it's:
- Easier to weld.
- Less distortion (distortion is bad).
- You'll make a better weld than if you only prepared on side rather than both sides.
Corner Joint:
Corner joints are either: Flush (and also referred to as Closed), Half open, or Full open:
- In the image above see Corner Joint A. These types of Corner joints are often used for fabricating boxes and tanks and the like. Image A is a fillet weld corner joint.
- Now look at B. It's a closed corner joint. You'll see this type of corner joint frequently with 20 gauge (or less) sheet which is considered a lighter sheet metal. When you make a closed corner joint with the oxy acetylene welding process you will use no filler, or maybe just a little bit, and the edge will melt down and overlap. If you are stick welding it just use a small bead to complete this joint. But if you are using the closed joint on thick metal or heavy metal you will bevel the plate that is lapped using the V or U groove to allow for root weld penetration.
- A half open corner weld joint is fine for metal that is 12 gauge or more. If you can only weld on one side for whatever reason, and also if strength is not real important, then you can use the half open corner joint.
- Image C is an open corner joint and it is considered to be the strongest corner joint you can make. And you will use this on heavier material, like thicker sheet metal or plate. The way this joint is prepared is to melt the edges and add filler material to the corner.
- Image D shows a corner weld joint on heavier material. So you will weld on both sides of the joint. As you can see in the image you will make a weld that is very similar to a sealer bead at the root of the outside fillet weld. The sealer bead is a reinforcing bead.
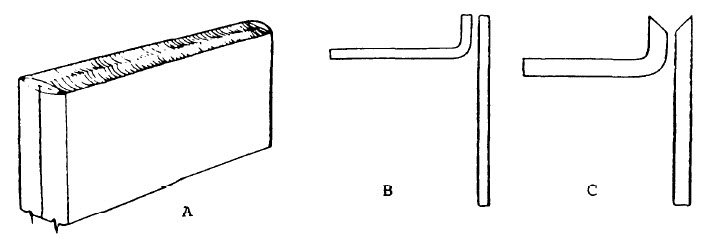
Edge Joint:
An edge joint is one of the weaker welds. It is used most often on sheet, plate reinforcements, mufflers, and more.
- Look at image A above. As you can see there are two plates welded together at the top. That is one edge joint weld. These are heavier plates and filler material is used to melt and fuse the edges of the plates in order to create proper reinforcement.
- In image B, this type of edge joint requires very little joint preparation. All you will need to do is clean and tack weld them. You do not need filler material because the edges will melt together and fuse that way.
- In image C you will have to bevel the edges (notice the V at the top) because otherwise you will not get proper fusion. You will need to use filler material in order to get penetration of the weld which causes fusion on the side of the walls.
Lap Joint:
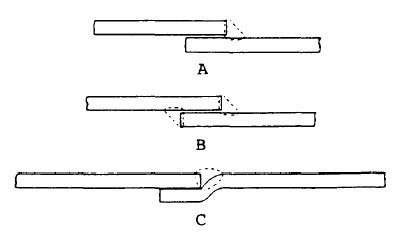
As the name implies, your joint will be your base metal overlapping one another:
- Image A is an example of a one sided weld (fillet weld) of a single lap joint.
- Image B shows you a weld on both sides which will make it much stronger.
- Image C is what is called an offset lap joint. Your weld will be done in the natural seem made by the offset. It is usually a stronger weld than a single lap joint, but it can be more a more challenging joint preparation.
Tee Joint:
A Tee joint is another joint that looks the way it sounds. If you look at it from a cross sectional view it looks like the letter 'T'.
So it basically where two pieces of flat bar, plate, or whatever are at a right angle but not on the edge. If it was on the edge you would be making more of a corner joint.
As you can see in right hand side image above there is weld on either side of it. To prepare this Tee Joint you will bevel the edges, tack weld it on both sides, and then lay a bead on either side. But there are occasions where you will only weld one side as you can see in the left hand image.
Note that the beveled edges on either a single side or double side weld will be at an angle that is about 50% of what you would do on a Butt joint.
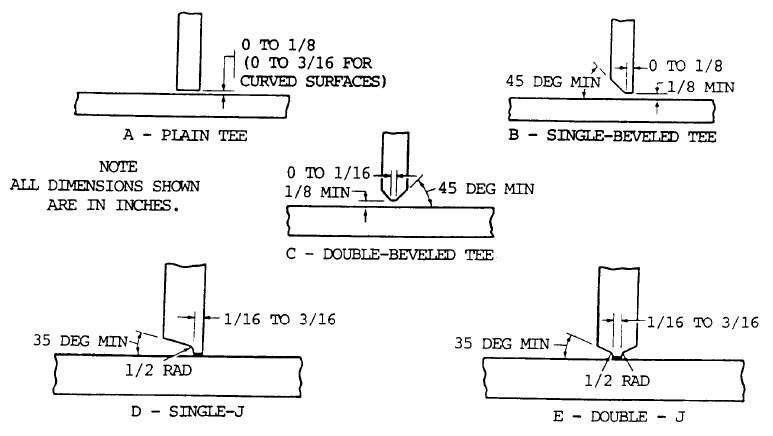
Joint Preparation For Tee Joints Part 2:
- A regular Tee joint is seen in Image A above. This is a Tee joint that does not require any prep. Of course, you will clean the base metal (both pieces).
- Image B shows a single joint bevel. This will be used on heavier sections and you will be welding both sides.
- Image C is a joint that has been beveled on both sides, and both sides are welded as well. This type of preparation is for thick plates.
- Image D is what is called a sing J joint. You will weld both sides of this material but only bevel one side of the joint.
- Image E is to be used on even heavier or thicker material and it is called a double j joint.
It is very important that you get good penetration. You want penetration to the root of your weld.
Welding Plans:
New! Welding Table
New! Log Splitter
Top Projects:
