How To Build A Welding Cart!

Do you want to build a welding cart like the one here on the right?
This is a winning design that was created by a professional welding engineer. It is ideal for MIG or TIG welding.
The steps to building this MIG or TIG cart are below, along with illustrations.
Materials You'll Need:
Here are the materials you'll need to put this welding cart together:
- (20 FT) Square steel tube, 1" X 1" X 16 GA.
- (15 3/16 IN) Round Steel Tube, ¾" X 16 GA.
- (27 IN X 24 IN) Mild steel sheet, 16 GA.
- (2) Swivel casters with plate mounting.
- (2) Wheel, 8" x 2 ¼", steel rim with rubber tire.
- (4) SAE Washer, 5/8".
- (2) Cotter pin, 1/8" x 1 ¼".
- (15 1/2 IN) Steel barstock, 5/8".
Refer To This Chart Of Part Numbers As We Move Through The Steps Of Building A Welding Cart:

Build A Welding Cart In Just 16 Steps!
Step 1: Cut part numbers WP-903-3, WP-903-3, WP-903-5, and WP-903-15.
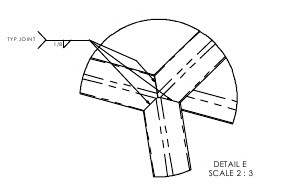
Step 2: Position
as shown on drawing WP-903. Make sure the corners are squared (90
degrees). Weld as per the drawing. This sub-weldment is the bottom
frame.

Step 3: Cut parts WP-903-1 and WP-903-4.
Step 4: Position as shown on the drawing.
Make sure the corners are square and weld per the drawing. This creates the top frame.
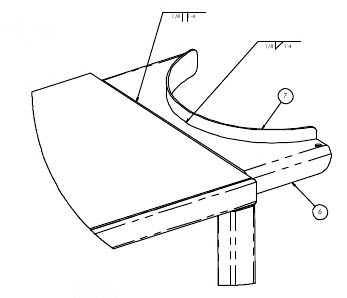
Step 5: Fabricate the tank saddle, part number WP-903-8, from 16 GA mild steel sheet.
This can be band saw cut or cut with a hack saw and bent on a bending brake.
Step 6: Weld part number WP-903-8 to the top frame as shown on the drawing.

Step 7: Cut and weld part number WP-903-11 to the top frame as shown on the drawing.
Step 8: Weld
part number WP-903-7 (legs) to the bottom frame as indicated on the
drawing. Make sure they are straight, parallel to each other and
perpendicular to the bottom frame.

Step 9: Weld the top frame to the top of the legs (WP-903-7).

Step 10: Weld the decking material, part numbers WP-903-12 and WP-903-13 to the bottom frame.
Step 11: Fabricate the tank ring, part number WP-903-14, and weld to the rear deck as shown on the drawing.
Step 12: Using a tube bender with a ¾" x 4 ½" bend radius die, fabricate the handle, part number WP-903-10.
Step 13: Weld the handle to the top frame as indicated on the drawing.

Step 14: Paint or powder coat the frame weldment as desired.
Attach
the 3" swivel casters to the bottom of the lower frame. The details of
how these attach will depend on your particular casters. Some will
attach with fasteners. Others will need to be tack welded in place.
Step 15: Slide the axle rod, part number WP-903-2 through the holes at the rear of the weldment.
Step 16: Attach the wheels with an SAE 5/8? washer on either side of the wheel hub. Secure in place with a 1/8? x 1 ¼” cotter pin.

Welding Cart Project Notes:
The
welding tank can be secured to the cart with a short length of small
chain, cable, bungie strap, etc. It is meant for this security
chain/strap to use the holes in the tank saddle bracket for attachment,
part number WP-903-8.
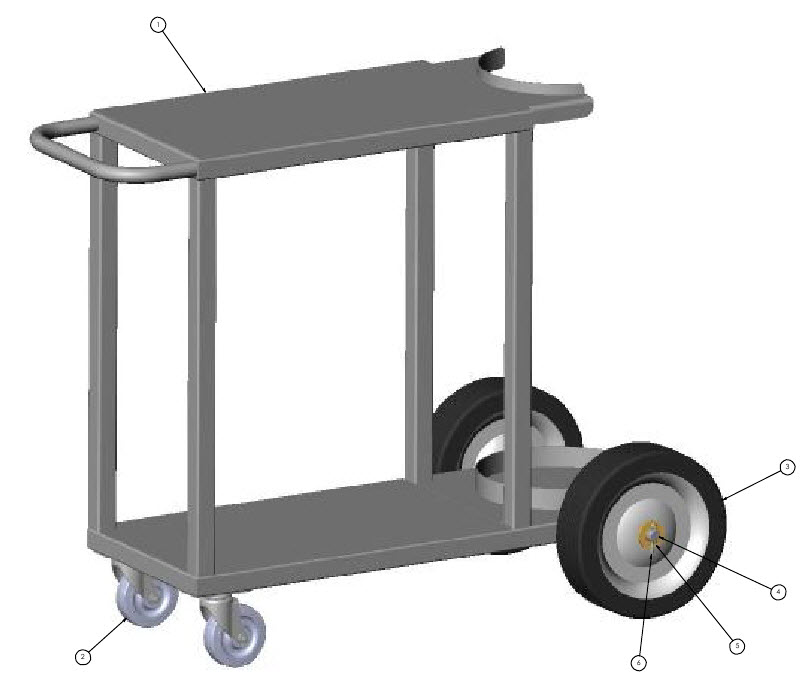
Final Parts:
Refer to these parts names and numbers in conjunction with the illustration of the welding cart diagram below it.

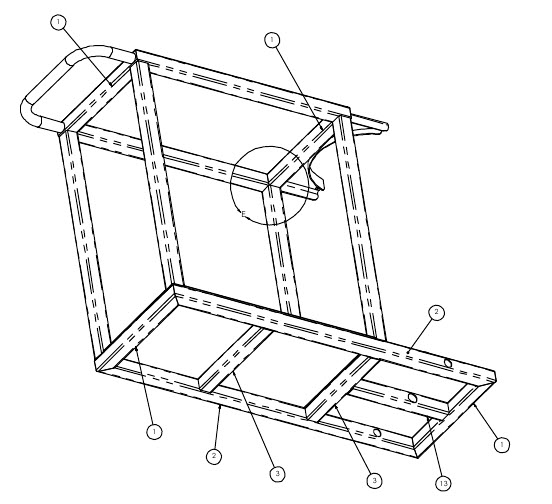
Weldments:
Here are some of the weldments that will help you build a welding cart from the instructions above.
ATTENTION: Please note that we have a PDF version of this plan set that has much more in terms of details, measurements, and weldments which will be helpful if you are not an advanced metal worker or welder.
The list below refers to the weldments illustrated underneath (click the images for a larger view):

  |
  |
Completed Welding Cart!


Welding Plans:

New! Welding Table
New! Log Splitter
Top Projects:
