Body Shop Oil Drainer Pan Project!
This oil drainer pan project is more for the intermediate rather than beginner welder, this being said if you feel up to the task then why not have a go.
The body shop oil drainer pan project came about when I was in an auto body shop having a service on my Saab 9-3. I saw the guy draining the oil into a large bucket then having to man handle the bucket of oil out of the body shop, this was when I saw a need for a body shop oil drainer welding project.
If you love to work on your car or you own an auto body shop that carries out oil changes and services then this project is for you. This drainer pan project will really pay dividends as you have a comfortable alternative to a large bucket when draining oil.
Below is everything you need to know to carry out this welding project.
Body Shop Oil Drainer Welding Project:
So what tools and materials are needed for this project? Below is a list of what is required.
- Mig Welder
- Tape Measure
- High gauge (thin) metal sheet
- 4 trolley wheels
- Wire mesh
- Metal bender
- Guillotine or bench shear
- Steel cutting circular saw
- Metal scribe
- Paint and spray gun
Now you have everything you need it is time for you to don your welding gear and get to work on this project.
The dimensions of this drainer pan project are: Length 750 mm Width 500 mm and depth 250 mm
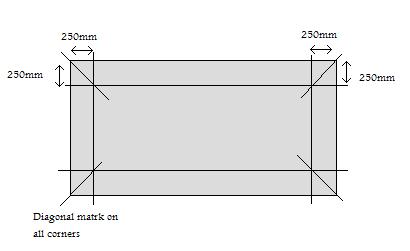
Using your scribe and tape measure, measure out 1250 mm by 600 mm on your metal sheet, this is the basis of your oil drainer body
Cut out your marked area from the metal sheet, now measure 250 mm inside from each edge and mark this (as in figure 1. Below). Also then mark from the diagonal point on the edge of the metal to the diagonal point on your marked square 250 mm from the outside edge of your metal (again view figure 1.)
Using you metal cutter cut down the diagonal lines at each corner to the 250 mm marked corner.
Take your sheet and bend the flaps from the 250 mm marked area to just under 90 degrees so all flaps are facing the same direction and the flat sheet now looks like a rectangular box.
Using your Mig welder weld the corners together, this should now show a box with slightly angled corners. You may have a slight excess of metal on the corners that can be cut off before or after welding, your choice.
Measure out the outside edge of the top of your box and now take your wire mesh and cut out a rectangle to this size. You can now weld this mesh on the top of your box.
Your 4 trolley wheels should have come with steel supports so you can weld these directly to the bottom of your oil drainer project.
There is two options now, you can finish the project by spray painting the oil drainer in your desired color (I advise red, blue or another color that will show clearly that oil is in the drainer or not). Alternatively you can add your own handles on the side prior to painting to add an extra supportive feature.
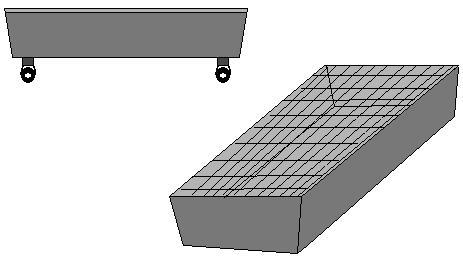
You should now have an oil drainer very much like the below:
Below is figure 1 for marking your sheet metal for the drainer pan project:
You can now stand back and admire your handy work, you will have a perfect receptacle for draining oil into that can be wheeled out of the body shop to where ever required.
This body shop oil drainer pan project not only supports making your job easier and ensuring no oil is spilled anywhere else, it also supports health and safety as you don't need to carry the oil for any distance.
Related Project:
Plans for a professional quality low boy oil drainer.


Welding Plans:

New! Welding Table
New! Log Splitter
Top Projects:
