Arc Welding Tips and Tricks!

Here are some simple arc welding tips and techniques you can use to improve your stick welding skills. Let's begin.
By the way, when you weld be certain you wear some quality gloves, a helmet, clean quality lenses in your helmet, and safety glasses.
When you light your rod make sure you are comfortable. There's nothing worse then getting tendonitis or carpel tunnel.
I know because I have it and wish I had followed some ergonomic positions a little better.
Scratching Method For Starting The Arc (Also Known As Brushing):
Scratch the rod on your metal, and the bring the rod back to begin your molten weld puddle to start welding.

The Tapping Technique For Starting The Arc!
You can also use the tapping method to start the arc. Here's how this works. You need to hold the welding rod in a 90 degree angle to the base metal.
You begin the arc by tapping it on the metal surface. After you tap it you will lift it to about the distance of the diameter of the welding rod. So if you have a 1/8 inch rod, you hold it about 1/8 of an inch from the surface.
You can also 'bounce' the welding rod rather than tapping it.
You'll know you have an arc when you hear the distinct stick welding sound which is a crackling sound.

Is Your Welding Rod Sticking?
Whether you are using the tapping or scratching technique to start the arc you may find that the welding rod will stick as you pull it away to begin your weld. To free up the welding rod you can use a flick of your wrist in a sideways motion.
If this does not work then you'll have to turn your arc welder off, or you can take the welding rod off the stick holder. Then, use your chipping hammer to get the rod off the material.
In Arc Welding It's All About The Puddle!
When
you begin your weld puddle make sure the arc gap is steady, and set
your amperage settings at the right level in order to allow for your
weld puddle to spread out.
The weld puddle, which is molten
metal, will follow the heat generated by your arc. So avoid undercutting
by filling in and along the edges of your material.
A simple but good arc welding tip is to add some filler metal to your weld puddle prior to taking it out and back over the weld.
Always
be observing your weld puddle because a good weld is always
accomplished by focusing on what is occurring it it. As you are welding
you will need to control how much filler material you'll use and control
how much heat is being generated, which totally effects the weld
puddle.
What you don't want to do is look directly at the rod or the light. But what you do want to do is focus your attention on the molten metal or the weld puddle (others call it the weld pool).

Observe how much weld your are building up. Watch the edges of your weld, and see how fluid the weld is, and adjust slightly as you do all of this.
The main control of the heat is provided by the amp settings. The amp settings on your machine are what regulates how much current you are sending through your welding rod.
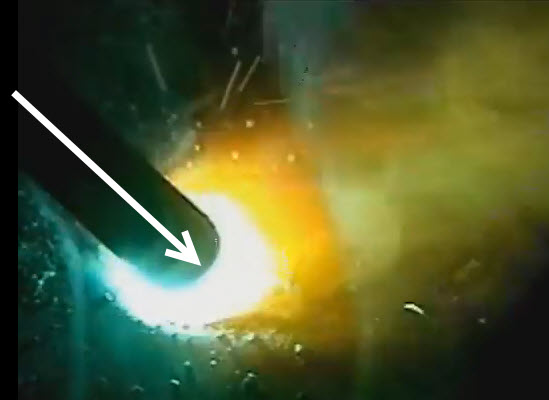
If your settings are too low you will find that the weld puddle will just form under the end of your welding rod as seen here:

But if you increase the amps you will generate more heat and then you will create a molten pool (weld puddle). This is about where you want your puddle to be:

This is the point where you will be able to control the weld build up, and the edges of your puddle, and begin to get penetration of your base metal (you always want good penetration).
A good arc welding puddle will flow nicely out from the edges of your welding rod like this, but not too much becauase you will lose control of your puddle:

The amount of heat you want to generate will change when the following occurs:
- Metal thickness changes.
- Welding position changes
As I mentioned above you must watch the puddle. And what you want to observe is how the weld puddle is flowing to either side of your welding rod.
When you increase the amps your weld will spread out more and penetrate deeper.
If you increase the heat too much you will not be able to control the your puddle. So what you want to do is play around with your amperage settings to the point where you find that you are getting smooth welds while also getting good penetration.
In other words you want to keep the amps as high as possible but not to the point where the puddle is to difficult to control.

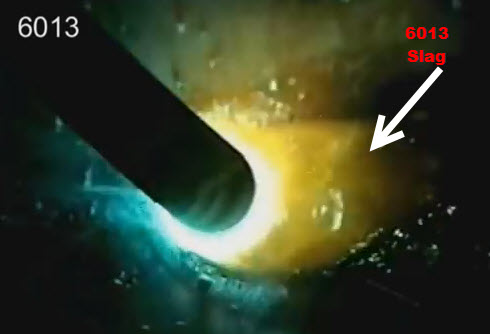
Arc Welding Rod Tips, Types, and Their Weld Puddles:
Welding rods have a coating of flux on them and these rods come in different diameters and they have different characteristics which effects how your weld puddle appears.
6010 and 6011 Rods - The weld puddle is visible:

6013 Rods - Slag covers the rim of your puddle. But the weld puddle is visible on both sides of the rod and the puddle moves fairly easy:
7018 Rods - Slag will cover the whole weld puddle.
However, with 7018 welding rods you want to be able to see the puddle flowing on the sides of your rod as well as the slag solidifying behind it.
Also, as you weld the filler material is hardening beneath the slag covering. But the slag is still molten. So what happens is that the slag can drip if you are welding in the vertical or horizontal position.
Newbie welders will believe that the weld is way to hot as they see the slag drip, but that is not necessarily the case.
7018 is not the easiest welding rod
to work with but it just takes a little practice and you'll need to play
around with the amperage settings as well. However, you'll get a better
overall weld if you can run it a little hot.

What Determines How Fast The Metal Heats Up In Arc Welding?
The amperage settings only give you the heat you need. It's your rods angle that determines how fast the metal will heat up.
If your welding rod is at a perpendicular angle, you'll find that the molten weld will spread quicker which will allow you to weld at a faster speed. This also puts a limit on how much you penetrate your material. And this is good if you are welding on thinner materials.
You'll
also be depositing less filler metal thereby creating a smaller weld or
you'll have a flatter weld bead if there are beveled edges when you use a perpendicular angle.

When you take an angle with your welding rod you'll put less heat on the material (base metal). This will create an opportunity to travel at a slower speed and this way you can create more weld build up (a crowned bead).
However, if you take too much of an angle you will not get enough heat to your base metal and you will have a thinner molten pool (in appearance). The bead will stack and then you'll lose control of your weld puddle.
This is a good angle:
Most of the time you will keep the same rod angle for most joints, assuming they were prepared well with good fit up. However there are times when you will need to vary the angle of your rod.
For example you may need to fill a gap. So you'll make more of an angle which will slow down your speed of travel and therefore you'll deposit more metal into the gap. And then, you will go back to your original angle to complete your weld.
Changing and controlling your rod angle requires a little bit of practice. However, you'll get better, faster, if you can stay relaxed.
The main goal here is to keep the molten weld puddle in a uniform size throughout your welding. And it does not matter if you are angling your rod to build up the weld deposit, or if you are need to flatten a bead by taking a more perpendicular angle. You should always maintain the size of the puddle with the travel speed.
More About Arc Gap!

The distance between the metal and the tip of your welding rod once the arc is struck is called the arc gap. And stick welding machines (arc welding machines) use a constant current power source. So when the amperage is set the voltage varies as it is maintaining the arc.

You don't want your arc gap too short or too long. But you can use small adjustments in the arc length to help control the weld puddle.
Generally
speaking, a medium arc gap is good for building up weld.

Conversely, a short arc gap length will limit the heat to the molten metal which in turn cools it down.
7018 Rod Arc Welding Tip: When using 7018 rod, a shorter arc gap might work well if building up the weld is desired.

If you lengthen the arc a bit you'll increase the heat and spread the weld puddle out.
If you combine a longer arc gap with a more perpendicular angle you'll make a smaller bead or you'll flatten your weld on thicker metal.

Developing Your Own Arc Welding Technique!
The most crucial factor when you weld is to maintain consistency as you weld. When you change the arc gap as you weld you change the amount of heat to the weld puddle and creating a uniform weld is hard.
As you learn all these different techniques and technicalities in welding you soon discover that there are many ways to run a weld bead. And that is the reason that most welders do things a little bit different than each other.
What all good welders have done or continue to do is practice and fiddle around with their welds so that they can find ways to manipulate the weld puddle. Watch it, and control it, and as you practice you will create a welding style for yourself.
The Weld Bead and The Affects On Metal!
The heat that is generated effects the metal you are welding. See, metal is made up of atoms that have been bonded, forming a grain. And when the metal you are welding is heated and cooled you create smaller grains which makes the metal even harder.
Cooling the
metal at a slow rate provides the opportunity for atoms to bond and form
larger grains which in turn makes the metal softer.
When you are welding the metal, the metal which is just next to the bead you are forming gets very hot which changes the structure of the metal grains.
And since there is a small area that is heating up from the weld bead the metal will cool down fast, and if you followed what I was saying above, grains are formed right along the side of the weld bead. The grains are smaller in size and they become hard.

In addition, a weld bead causes the joint you are welding to 'draw'. In other words, it expands as you are welding. And when it cools down it contracts.
The metal will draw toward your weld. So in other words the metal moves, no matter what and this causes stress in the metal if the metal has nowhere to go.

%20weld%20puddle.)
So what you want to do is weld on both sides of the joint whenever you have the opportunity. You can also try tacking and us intermittent welding (staggering) your weld to reduce this from happening as severely, especially on square tubing or pipe.
When welding on metal and there are significant temperature issues there are greater effects on the material. For example, if the metal is really cold, you should pre-heat the material prior to welding with a torch. When you pre-heat freezing metal you'll see moisture build up. Stop heating the metal until the moisture disappears (dries).
In addition, when you are
arc welding harder metal (high carbon steel) you'll probably want to
pre-heat it because high carbon steel does not like expansion and
contraction. It may crack when it cools.
In welding, there's a lot to consider. But don't overthink it too much. Simply do your best to finish a weld once it's started.
- Do not create more weld buildup than is needed.
- Let the metal cool down slowly when you are done welding.
If your material cracks or breaks next to your weld then take a second look at the design you are working on as well as if the metal thickness is appropriate for the design.
Recommended Arc Welding Tips Article:


Welding Plans:

New! Welding Table
New! Log Splitter
Top Projects:
