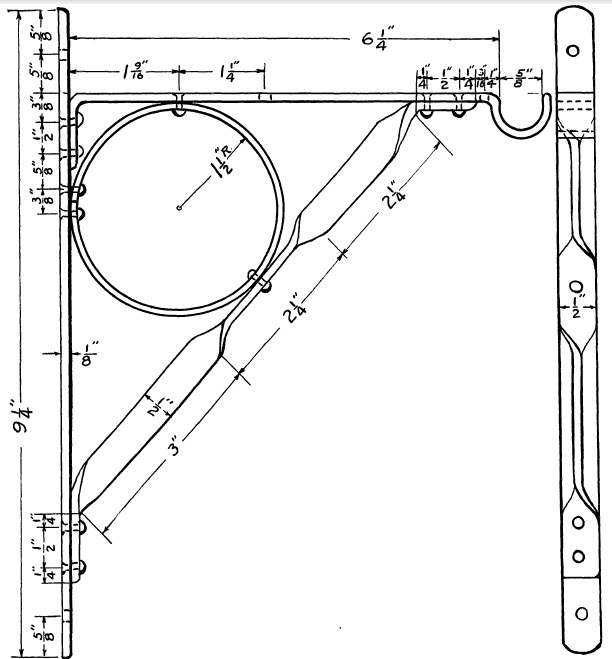
How To Make Decorative Shelf Brackets!
Please Note: This decorative metal shelf bracket building guide is from the great old and out of print book called, '101 Metalworking Projects' and is available only from us in paper back (Highly Recommended!).
Lets Begin:
Subject and Uses: This braced bracket may be made to serve as a
support for a shelf or for a lantern. The design offers a great variety of
possibilities for innovation along the line of embellishment through
circles, curves, and twists.
It
is interesting to analyze how weight is supported by the different
members of a bracket and to trace the stresses and strains that are set
up in the joints and in the members under different kinds of loads.
Rivets are used for fastening the parts together. Holes for the rivets
should fit the shank, and should be countersunk where rivets are to be
flush with the surface. If the rivets are to have round heads on both
sides of the joint, an allowance must be made in their length so there
will be sufficient stock to form a head on the plain end.
The heads are rounded by a header, which is a tool with a recess the shape of the desired rivet head. This header is set on the rivet, and struck with a hammer until the desired head is formed.
Rivet heads may be flat, conical, hemispherical, or like a spike head or any shape that will help to make the bracket look more trim. In upsetting a rivet, a solid support is required. The rivet is struck squarely in the center to begin with, then light blows follow around until the head assumes a symmetrically rounded shape.
Small rivets are upset
cold, while on structural steel and boiler work, the rivet is heated
red-hot, inserted in the rivet hole, upset, and formed before it has
cooled off, the shrinkage, in cooling, drawing the joint together with
an enormous force.
Object of Lesson: Making a twisted brace; riveted joints; and ring
brace.
Tools and Equipment: Riveting hammer; vise; hack saw; drills;
countersink.
Materials Required: One piece of band iron, 1/8 by 1/2 inch, 38 1/4 inch long, for back, ring, top, and brace; 10 rivets, 3/16 by 3/8 inch.

- Cut the stock to lengths for the four members, as follows: Back, 9 1/2 inches; top, 10 inches; brace, 9 1/2 inches; and ring, 9 inches long.
- To make the ring, file the ends square and drill rivet holes 3/16
in. from each end, and bend the iron around a pipe. - To shape the top, grip the end in a vise between the jaw and
a piece of 5/8 inch round stock, and bend a half turn. Then grip the half circle in a vise on the round stock, and bend the top back at a right angle. - Drill two rivet holes at the other end of the stock for the top, and bend it down at a right angle, 1 in. from the end. The rivet holes are countersunk on the outside of the top and back pieces.
- Locate and drill the holes for the wall screws and rivets in the
back piece, except the rivet holes for the lower end of the brace. - To shape the brace, mark off the distances for twisting, and grip
the stock in a vise, 1/2 in. below one of the marks. With a monkey wrench set 1/2 in. above the mark, twist the stock one fourth of a turn. Repeat at each of the four places shown in the drawing. - Bend the ends to fit against the top and the back pieces.
- Locate and drill rivet holes in the ends of the brace and one hole
for the ring. - Locate and drill rivet holes in the top for the brace and the ring;
also the screw holes for fastening a shelf on the bracket, if desired. The top must be at right angles to the back. - Locate and drill rivet holes in the ring to meet the holes in the
top and the brace. - Assemble and rivet the top to the back; the ring to the back; the ring to the top; the brace to the top; and the ring to the brace. Mark, drill, and rivet the brace to the back at the bottom. All rivets have round heads except on the outside of the top and the back.
- Round off all ends, to a smooth finish. Apply a coat of linseed oil
or dull back enamel.
QUESTIONS:
- Why should holes be drilled to fit rivets?
- What precaution must be taken in riveting, to secure a tight joint?
- What qualities must metal have to be suitable for a rivet?
- In starting to upset a rivet, why should the blow strike the rivet end square and in the center?
- If a 1 inch rivet will support 20 tons, how many pounds will a 1.8 inch rivet support?
You can get this metalworking project and 100 more from one of the best and oldest metalworking guides ever made:
Copyright WcWelding.com All Rights Reserved.
Welding Plans:
New! Welding Table
New! Log Splitter
Top Projects:


