Basic Welding Positions!

The four basic welding positions are: flat, horizontal, vertical, and overhead.
The most common type of weld you will do is a Fillet weld and a Groove weld, and you can accomplish these welds in all four positions.
But you also do surface welds in all four positions as well, thought you will not do this type of weld very often.
There are numbers that are used to designate the type of welding position and weld.
For example:
- 1 = Flat Position
- 2 = Horizontal Position
- 3 = Vertical Position
- 4 = Overhead Position
In addition there are letters that designate the type of weld you will do in that postion. For example:
- F = Fillet Weld
- G = Groove Weld
Quiz: What does 3F mean?
Answer: Vertical Position Fillet Weld.
The Flat Position:

In the flat welding position you will do your weld on the top side of your joint. But the actual face of your weld will be in a near horizontal position.
The common term for this kind of weld is called, 'flat position' but it is also referred to as the 'downhand' position.
The image on the left is a flat position fillet weld, and the image on the right is a flat position groove weld example.
Out Of Position Welding:
The flat welding position is the easiest position and most desirable position to weld in. In the flat position the metal is flat and your welding torch or rod is going to move in a horizontal direction.
The other positions are called Out Of Position because the are more difficult and require more skill to do them well. The out of position welding positions are: Horizontal, Vertical, and Overhead.
The Horizontal Position:

The image on the left (above) is a horizontal position fillet weld, and the image on the right is a horizontal position groove weld example.

- In the Fillet Weld position you will weld on the top side of the surface that is horizontal (or close to it) and against a surface that is vertical (or close to it). See the illustration above.
- In the Groove Weld position the weld axis is in a horizontal plane (approximately), and the face of the weld is on a vertical plane (approximately). See Image B above.
- The Horizontal Fixed Weld position is a pipe welding position and the pipes axis is nearly horizontal. Note that the pipe being welded is not being rotated as you weld. See below for more information on Pipe welding positions..
- The Horizontal Rolled Weld is a pipe welding position as well and it is being done in the flat position. Note that the pipe is turning (rotating). You can see the pipe weld positions below.
The picture of the weld bead to the above right is an actual horizontal weld using 7018 rod.
Vertical Position:

The illustration image on the left (above) is a vertical position fillet weld, and the image on the right is a vertical position groove weld example.
In the Vertical position welding the welds axis is almost vertical.
When welding pipe in the vertical position the pipes axis is vertical and you will be welding in a horizontal position. The pipe might rotate, or not. It just depends.
The actual weld bead picture on the right is a vertical weld bead using a 7018 welding rod.
Overhead:

In the overhead welding position you will do the welding beneath the joint. It's pretty self explanatory.
The 4F illustration on the left is an overhead position fillet weld, and the illustration next to it is an overhead position groove weld example.
Groove Welds: Summary Of Welding Positions.

Fillet Welds: Summary Of Welding Positions.
This diagram is a little bit more complex because it shows multiple fillet weld sizes and positions. it also shows single, double, and multipass welds...

Pipe Welding Positions:

Pipe Positions:
The positions you encounter when Pipe welding are many and usually the position will be fixed, however it's not uncommon to be in a flat position.
Horizontal Pipe Rolled:
Step 1: You will align Align the joint, tack weld it, or you can hold it with bridge clamps (made of steel) and your pipe should be placed on rollers. See illustration below. At this point you would begin to weld starting at C, and then move your weld up to point B. Once point B is achieved you will then turn the pipe until you until you get to point C (the weld stop point), and at this time you will begin welding up to point B. As the pipe rotates you should be holding your welding torch between the B and C points. Your pipe will turn past them.
Step 2: At point A your torch position is almost the same as a vertical welding position. And when you approach point B is your weld position is almost flat. You will alter the angle of the weld procedure a bit to compensate.
Tack Welded Pipe On Rollers:

Step 3: Stop the weld right before the start point (the root of your start point). What you want is a small opening here. Then re-heat your junction point. The temperature should be uniform in the areas surrounding your junction point. Complete fusion will occur with your start point as a result.
Step 4: If you have .25 inches thick or more of sidewall (of your pipe) you will need to do a multipass weld.
Horizontal Pipe Fixed Position Weld:
Once you have tack welded you should have them set up as indicated in Image E below. Once you start welding do not move the your pipe.
Horizontal Pipe Weld Uphand Method:

As you weld in the horizontal fixed position you will weld like this:
- Begin at the bottom. At the six o'clock position weld up to the three o'clock position.
- Again begin at the bottom and then weld up to the nine o'clock position.
- Go back to the three o'clock position and weld up to the top.
- Go back to the nine o'clock position and weld to the top and overlap your bead.
As you weld down you will do this in two steps:
Step 1: See illustration above for this - Begin at the top and weld down (See #1) all the way to the bottom.
Go back to the top and weld all the way down the opposite side (See #2). At the bottom is where you will meat and join the other weld.
Arc welding is the preferred method using the downhand (downward) method because arc welding creates an electric arc with a higher temperature and this gives you the ability to weld about 3x the speed of the uphand or upward welding method.
Horizontal Pipe Weld With The Downhand Method:

Using the backhand technique is recommended on low alloy steel or low carbon steel that you will be able to roll or that is weldable in the horizontal position...
- For pipe wall thicknesses 3/8 of an inch or less: One Pass.
- For pipe wall thicknesses 3/8 to 5/8 of an inch: Two Passes.
- For pipe wall thicknesses 5/8 to 7/8 of an inch: Three Passes.
- For pipe wall thicknesses 7/8 to 1-1/8 of an inch: Four Passes.
Vertical Pipe Fixed Welding Position Weld:
When pipe welding in the vertical fixed position and the joint needing to be welded is horizontal, you are most likely to use the backhand technique.
You will start your welding at the tack weld and then go round.
Vertical Pipe Fixed Position Weld With Backhand Method:

Multipass Arc Welding:
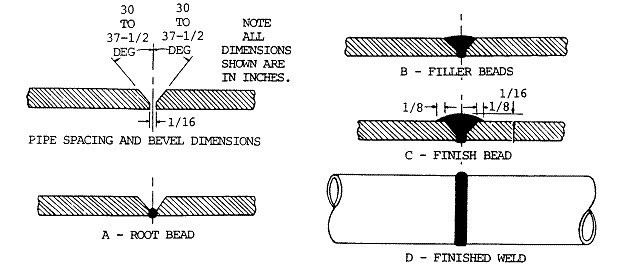
Root beads: When using a lineup clamp you will start your root bead at the bottom of the groove.
- If there is no backring being used you should carefully create a small bead inside of your pipe.
- If you are using a backring you should build up the the root bead and while fusing it to the backring.
Remove the clamp after you put as much root bead as the line up clamp bars will allow. But you should finish the bead once your remove the clamp.
Filler beads: You should take good care with filler beads and be sure that they are properly fused with your root bead and you want to remove any weld defects specifically undercutting from the root bead deposition. Usually filler beads of 1 or more all the way round the pipe are necessary.
Finish beads: You will complete your joint by putting finish beads (See Image H) over your filler weld beads. The most common bead made in this fashion is what is called a weave bead which is approximately 5/8 inches wide and about a 1/16 of an inch over the pipes surface when you are done. See Image H.
Deposition Of Root, Filler, Finish Weld Bead:
Related Articles:


Welding Plans:

New! Welding Table
New! Log Splitter
Top Projects:
