A Tutorial On Welding Aluminum With MIG, TIG, and Gas!

Welding aluminum is more difficult than welding mild steel. But with a little bit of knowledge and practice you can do it.
In this article we will cover Oxygas welding, TIG welding, and MIG welding.
All three are very common processes used to weld aluminum.
MIG Tutorial!
MIG Weld The Thicker Stuff:
 |
 |
This is the inside of an aluminum container which is approximately 1.7 meters long. Our friend Phillip Dridge sent in these photos of his current project where he was welding 4043a with a Synergic Mig Welder at 150 amps. He used a 4. 5 meter water cooled torch with a Teflon liner. Nice work!
The easiest welding processes to learn are Flux core and MIG welding because this technology has made what can be a difficult skill to learn very easy.
There are those in the welding community who feel that the only way to weld aluminum is with TIG welding because it's much more versatile than the other processes, gets better penetration, and produces a better overall weld.
However, with the advancements in MIG welding machinery you can now weld aluminum quite well. But not the thin material!
Aluminum is a much softer metal than steel. And because of this you'll find that a spool gun is best to MIG weld it well, although there is an alternative described here.

As you may know by now if you've been using our tutorials, there are different thicknesses of wire, and different types of wire for MIG.
When welding aluminum you need to use aluminum wire in your MIG welder.
And because of its softness aluminium wire is difficult to push through
a standard MIG welding gun (some guys use a shorter cable if they don't
have a gun but it still is challenging).
As a result you will need a spool gun. A spool gun reduces the distance the wire has to travel and therefore it won't get jammed up on your welding cable.
There is also another gun called a push pull gun but it's more expensive machinery for a more expensive welder, so you'll most likely get a spool gun.
Shielding Gas:
MIG stands for Metal Inert Gas. The intert gas is used to sheild your weld from oxygen and other air contaminants that will ruin your weld.
For aluminum welding you will most likely need to use 100 percent argon shielding gas.
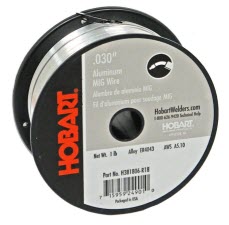
MIG Wire For Aluminum Welding:
Depending
on the type of machine you are using and what the user manual says,
it is recommend that you weld only on 14 gauge or thicker aluminum using
the MIG process (so if you are welding on anything thinner then you
will need to TIG or Gas weld it).
If the aluminum is thinner than 14 gauge you will probably burn a hole in your material.
A common MIG wire for aluminum welding is the 4043 .030" diameter wire.
Preparation:
In
the Oxygas welding section below I go over a lot about preparation
which is basically the same for most welding processes minus the flux. So please read that very detailed tutorial to build your knowledge on welding aluminum.
Clean material welds the best so remove the oxides with a stainless steel brush. By the way, use a totally separate brush for cleaning aluminum.
Using the right wire is critical. Check your users manual for the right type as well as other settings.
Tips For MIG Welding Aluminum:
- You will TIG weld aluminum in AC. Simply put is has to do with the aluminum oxide layer that form on aluminum. The AC polarity helps remove the oxide layer. Most other metals are welded on DC- polarity (DC minus).
- Use a 10-15 degree push welding angle. This angle allows for the shielding gas to be in front of your weld puddle.
- When using a drag welding angle the weld will look black and ugly.
- The nozzle of your welding spool gun should be approximately .75" away from the base metal. If you get closer you may get what is called burn-back or other wire feeding problems.
- Check your welding machine chart for the correct voltage and wire speed for the material you are welding. If you set them right you should create a spray arc transfer. This type of welding sounds like a hissing sound.
- If you are getting a lot of smoke and spatter you should adjust your settings, but some smoke and spatter is normal.
- Large weave beads are not recommend for welding aluminum. But using a straight welding technique or even a stitching welding technique will give you results that are impressive.
- However, welding aluminum is much more difficult than welding steel. But once you practice a bit you will be very good at it. Especially when using a MIG spool gun.
- But like I said above, if you are going to weld thinner aluminum then use TIG or Gas Welding.
Tutorial On Welding Aluminum With Oxy Acetylene:

Did you know that pure aluminum is not nearly as strong as steel? It's only about 25% as strong. But that's why mills mix in other types of material (nickel, manganese, copper etc) to whip up a stronger aluminum.
Most aluminum that you will be welding is about ninety percent pure and that is because it's been processed to be stronger.
Ann old school way to weld aluminum is to use Oxy Acetylene (OxyGas or Oxy Fuel). However it's usually only used on material that is .031" - .125" thick. For thicker or thinner material consider using TIG, MIG or Seam Welding depending on the thickness.
By the way, learning to weld with an Oxy Acetylene torch is an excellent stepping stone to learning TIG welding.
Tips On Practicing!
It's no secret that welding mild steel is much easier than welding aluminum. So it's a good idea to practice it first.
Step 1:
- Get some aluminum sheet metal. Just a small piece will do.
- Set it down on your welding table.
- Make a preheat flame with your torch (also known as a neutral flame).
- Take the cone of your neutral flame and put it above the aluminum sheet to a point where the inner cone part of the flame is nearly touching your metal.
- As you can see, the metal literally turns molten and burns a hole through your material.

Step 2:
- Do this again except now angle your flame about thirty degrees to your material.
- Try to maintain this angle without melting a hole. It will take a little practice. But move it like you were going to create a weld bead in a line and do this while creating a molten puddle without melting a hole.
- Take the flame away. See how this pool of metal hardens fast?
- Do this procedure to the point where you feel you have good control of the molten metal.
- Once you feel you have good control now it's time to weld something.
- Try welding without using any rod first. To do this all you need is to weld two types of butt joints:
- flanged - no rod required.
- notched- no rod required.
- The reason no filler rod is required is because the flange or notches will melt and form the weld (on thinner aluminum).
- And after you feel like you have accomplished a nice weld on these two joints without a welding rod, now it's time to throw the welding rod into the mix.
- Use a welding rod on on a piece of thin aluminum sheet metal. Weld a butt joint. Then weld some other aluminum bits and parts you have lying around.
Oxy Acetylene Aluminum Welding Rods:
You want to match the type of aluminum you are welding to the rod type. For example, if you are welding 3003 or 1100 aluminum you will want to use an 1100 filler rod.
A common filler rod for aluminum is the old 4043. It's good for welding 6000 series aluminum, and many welders like this rod.
Flux:

Do you know what flux is? It's used to get rid of oxide which destroys your welds. Oxidation occurs when oxygen mixes with your weld seam. You do not want this...it's the enemy of welders!
So to combat this we have shielding gas for MIG and TIG welding. For Arc Welding a shielding coating is used on the rod.
In Gas welding (which is what Oxy Acetylene welding is), the gas forms a natural protection or shielding, but it's never good enough. Enter flux...
Flux should be painted onto both the filler rod and the surface of the material AFTER you have prepared and cleaned your material. Put it on both sides of your weld area.
The flux will keep any oxidation from occurring as you weld, and it happens very often and quickly in gas welding. So you must use flux.
What you do is buy flux in a little bottle, and to prepare the flux you simply make a paste out of it by mixing the powdered flux with water. Then you paste it on.
When you weld a flange joint be generous with your flux because you will not be using rod on it.
ATTENTION: Wash off all flux from your material because it will damage your metal if left on. You can use hot water and a good brush to remove it.
Preparation:
Welding aluminum is similar to welding steel in terms of preparation. Edge preparation is crucial, depending on the thickness:
- Up to .062": Create a ninety degree flange that is a tiny bit higher than the actual aluminum is thick. See illustration A below for an example (some say you can flange aluminum up to .125"). And you will not be needing a welding rod for flanged edges. Just fuse them together with your torch as you practiced in the first part of the article above).
- .062" - .188": Butt weld with notches. You can make notches with any tool you are comfortable with. You might want to use a chisel or a metal saw. See illustration B below for notching.
Notching of edges is a proven technique in welding aluminum that helps you get better penetration and distortion is less of a factor (distortion sucks!).
- .188" and above: Bevel your aluminum edges. See illustration C below. The bevel angle on aluminum that is .188" or greater should be ninety to one hundred and twenty degrees.

Remove Oxides and Clean:
Have you adequately prepared the edges of your aluminum? Good. Now clean the are that you will be welding. Use a wire brush, and use something like a mild alkaline solution for removing dirt, grease and other oils.
Pre-Heating:
If you are welding aluminum that is .25" or thicker you would be well served to preheat the material anywhere from five hundred degrees Fahrenheit to seven hundred degrees Fahrenheit.
Why Preheat Aluminum?
Because it will help you eliminate potential stresses in the metal from the heat you generate in the metal as you weld.
You will not need to use as much oxygen or gas as you weld as a result of preheating.
But be sure that your material does not get above seven hundred degrees Fahrenheit because you will make your material weaker and it could start to crumble.
If you are welding thinner aluminum then just warm it up a bit because it will reduce the chance of any cracking.
Time To Oxygas Weld Aluminum!
Now that you have properly cleaned, prepared, and added flux to your material take your torch and make little circles where you will begin your weld.
Don't burn the flux! So keep the flame cone at the right distance to avoid that. And if you do burn it you need to start over by re-cleaning and putting more flux on there.
Take your filler rod and just lightly drag it on your material for three to four seconds, and repeat that. But take it out of the flame each time because it will probably turn molten before your base metal does and this will ruin your weld (you want both the filler metal and the base metal to melt together to form your weld).
The dragging motion (others call it scraping) as described will give you the signal when it's time to weld; You'll see the filler rod and the base metal turning molten without getting to hot (you don't want to much heat).
Do this for as long as it takes to complete your weld. But, do not keep your filler rod in the torch flame longer than needed. You'll know how long you should keep it in the flame by how much molten metal you need for the welding.
It just takes practice! And in not time your will master this movement of the rod, preheating, etc. etc.
Oxygas Welding Tips:

Push welding is a technique that is most popular for this type of metal because in push welding (aka forehand welding) the torch flame is not pointing in the direction of your weld.
And, if you haven't noticed yet, too much heat is disastrous. So using push welding will help preheat your aluminum edges which you are welding together, while reducing the effect of too much melting.
When you weld aluminum that is .188" or more make the angle you are welding at close to 90 degrees to the plane of your base material.
If you are welding thin material, so .188" or less your welding torch should be at a lower angle.
Angle is important in that more of an angle reduces your chance of melting a hole in your material or causing to much melting. And if you hold it at less of an angle you are allowing more heat to get to your rod and base metal.
Torch Motion:
.188 and Below: Torch motion is not an issue. Just move it straight. However if you are melting a flange then you can try using welding rod that has been flattened like a flat head screwdriver or a little paddle to dissipate any oxide that builds up as the material melts to create the weld.
.188 and Up: Torch motion becomes more important as the your aluminum gets thicker. So if you are welding .188" or above you should use a little more motion to spread out the filler material and fill the weld area properly.
- Try using a motion that is more side to side.
- Dab your welding rod into the molten weld pool as you move forward.
More On Angle:
How fast you oxy gas weld aluminum depends mostly on the angel you take with the torch. Some welders have used a technique where they lift the torch up once in a while to keep from making a big hole in their metal. But a better alternative in my opinion is to take an angle that is less rather than lifting it up...so it's actually a flatter angle.
Do not let the flames inner cone hit the weld puddle. Instead let it stay 1/8" away.
Speed up your welding as you get closer to the aluminum edge.
In the vertical welding position when gas welding aluminum, you should use a motion that is up and then down.
And if you are in the unfortunate position of welding overhead with gas then use a more back and forth technique, which is the same type of technique you should be using in the flat position.
Avoid Cracking From Welding:
Cracking is a problem with Aluminum. That is why we have spent so much time on preparation, pre-heating, and technique. Another way to avoid cracking is use 4043 aluminum welding rod because it melts well and a lower temperature...lower than your parent metal that you are welding which allows for the molten base metal to harden prior to the weld pool. See, the actual weld is last in line to harden and as a result the strains from contraction of the metal are limited to just the bead of the weld and not in the parent metal.
Additionally,
if you tack weld your material while it's in a welding jig. After you
tack weld, take the piece out of un-tighten your welding clamps, and then
finish your weld. This will also prevent cracking.
Once you
finish your weld, clean it up with a wire brush, and use hot water to
get rid of any flux that may still be on your material. However, only do
this after your material has cooled down.
Like I said before you want to be sure flux is not on your material because it will damage it through corrosion.
Tutorial On Tig Welding Aluminum!
Arguably the best process to welding aluminum is TIG welding because once you get good at it it's much more precise and it's cleaner.
Tungsten For Aluminum:

I highly recommend you read through the Oxygas welding tutorial above because it contains a lot of information that is transferable to TIG.
Ok, when it comes to TIG the first question is what tungsten do you use?
You'll get varying opinions on this but 2%
thoriated tungsten. It's a common tungsten for DC welding. You need to weld aluminum in AC, and AC TIG welding requires a rounded edge on your tungsten. So be sure to make that adjustment.
When you light the arc you should see a ball at the tip of your tungsten after a couple of seconds, and you are ready to start welding. You will be welding aluminum in AC so be sure your machine is set properly.
Shielding Gas:
Your shielding gas also needs to be set properly. You may find that 15 - 20 Cubic Feet Per Hour (CFH) is fine for aluminum. But check your machines user manual or guide.
Why Aluminum Is Tough To Weld:
Aluminum has a layer of oxide on it and even if you do a great job of cleaning your aluminum (which you should) there will still be a tiny layer of oxide. It melts at a higher temperature than the actual metal. And this is the difficulty.

If you are fortunate enough to have a welder with square wave technology then your TIG welding of aluminum is made a bit easier because Square Wave actually helps to clean the material as you are welding it!
But you should still clean your material to really make your welds nice because Square Wave will not clean off oils etc.
You Are Ready To TIG Weld:
One of the keys to TIG welding aluminum well is to add filler metal slowly. Watch the puddle carefully.
Torch Angle:
The best torch angle is to keep it at a 90 degree angle. You will get a nice puddle that is easier to work with when you hold your torch at a 90 degree angle to your base metal. But unfortunately you will not be able to see the weld puddle when your torch is at this angle so angle it 15 degrees, no less, so that you can just see the puddle.
If you go any higher than 15 degrees you will have a problem. Your puddle will 'wander' and your shielding gas will not give you the coverage you need, and there goes your weld!
Just Dab Baby!
You will be doing a lot of dabbing of your filler material. But dab your filler material in front of your torch and just to the edge of the weld puddle. And PUSH your torch. Do not pull or drag it.
Be smooth with your torch hand, let it glide nicely. And your other hand holding the filler rod will gently dab in front of the torch and at the edge of the puddle.
- TIG Technique: Be consistent with your filler metal. Create a nice rythm with the weld. Watch the puddle, and don't use to much movement of your torch. Practice!


Welding Plans:

New! Welding Table
New! Log Splitter
Top Projects:
