How To Build A Storage Shelf!

If you have shopped for a storage shelf or you bought some cheap Chinese made ones then you know that the good ones are expensive, and the cheap ones are flimsy and don't last very long.
Build your own quality shelves and save money. Let me show you how...
Storage Shelf Build Materials You'll Need:
- 26 feet of steel square tubing: 1 inch x 1 inch x .065 wall.
- 75 feet of angle steel: 1 inch x 1 inch x 1/8 inch.
- 8 feet of steel rectangular tubing: 1 inch x 2 inch x .065 wall.
- 1 1/3 inch particle board, .5 inch.
- 1 1/3 foot sheet: particle board, .5 inch.
- 4 hex nuts: ½-13 unified course thread (UNC).
- 4 hex head cap screws: ½-13 x 1.5 inches long. Grade 8.
- 1 box of self tapping screws: 8-18 x 1 inch long.
Storage Shelf Frame Weldments:
The images below show you the parts and weldments necessary to build the storage shelf. Use the numbers on the images and cross reference them with the parts list below the images. You can also get a one page pdf of the weldments here. And you can get the 12 page storage shelf pdf guide here (your support is much appreciated).
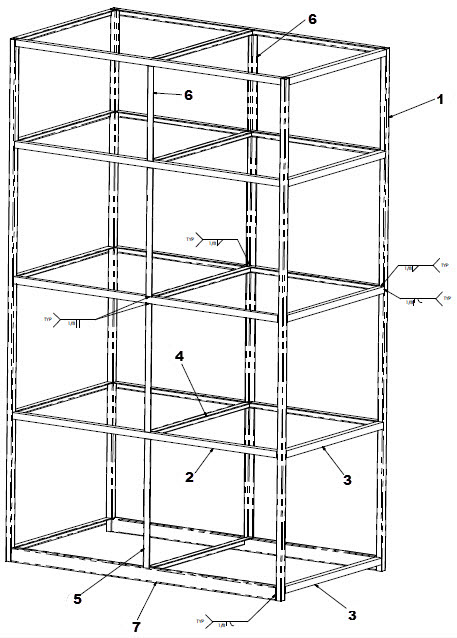

Parts List:

15 Simple Steps To Building A Storage Shelf!
Step 1: Cut part numbers WP-905-2, WP-905-3, WP-905-5, and WP-905-7.
Step 2: Begin by building one side of the shelf at a time: Arrange (2) WP-905-2, (4) WP-905-3, (1) WP-905-4, (3) WP-905-5, and (1) WP-905-6 as shown below. Lay the parts out on your shop floor making sure the frame arrangement is square and flat. Special attention should be paid to keeping the angle sections flat or flush with the surfaces of the tube sections.

Step 3: Weld all the top-side portions of the joints as per drawing WP-905. This side of the frame will be considered the front.
Step 4: Repeat steps 2 and 3 to make a second side frame.
Step 5: Cut part numbers WP-905-7 and WP-905-8.
Step 6: Flip one of the side frame sub-weldments over on its opposite side (welded side down). Position one of the WP-905-7 parts at the top of the frame (it will be perpendicular to the frame) and tack it in place. Tack weld another WP-905-7 to the bottom of the frame (the end where the 1” x 2” tube is welded). Again, it will be perpendicular to the frame. It should also be parallel to the first WP-905-7. If you have access to a corner clamp, this would be advisable to use so that these two pieces are welded on squarely.
Step 7: Repeat this process on the other side of the frame so that you will have four angle pieces welded to the back side of the frame half. Shown below:

Step 8: With an assistant and/or using corner clamps, stand both frame halves upright. Position both frame halves together as per the drawing. Make sure the two sides are vertical and parallel to each other. In addition, make sure each of the four sides of the frame cage are square. With several areas that need to remain square, it is very helpful to use corner clamps on at least two corners. Four is preferable.

Step 9: While the frame is held in place, tack weld the four corners together. Re-check alignment (frame vertical, corners square). Use a carpenter’s square, and a tape measure diagonally from corner to corner.
Step 10: Final weld all eight corners while the frame is clamped together.
Step 11: Cut part number WP-905-9 and weld in place.
Step 12: Begin adding the remaining frame members to the frame. Check position and alignment and weld in place.
Step 13: Lay the welded frame on its side and weld the ½-13 hex nuts inside the bottom end of the upright tubes (WP-905-2). The nuts should be flush with the bottom end of the tube. To position the nuts, screw a bolt into the nut to help hold it while welding. Tack weld the nut first to ensure proper alignment and position. Spray anit-splatter compound on the threads of the bolt. Leave the bolt in the nut to protect the threads of the nut. Completely weld the nut in place. After the shelf is in place, the bolts can be screwed in or out to adjust the height of the corner legs to account for an uneven floor.

Step 14: Paint or powder coat the welded shelf frame as desired.
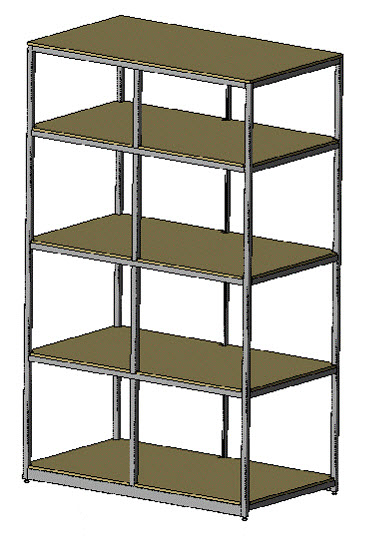
Step 15: Attach the shelf boards using the 8-18 x 1” self-tapping screws. You now have a very well built, rugged shelf that will hold hundreds of pounds per shelf!
Completed Storage Shelf:

Copyright WcWelding.com All Rights Reserved.


Welding Plans:

New! Welding Table
New! Log Splitter
Top Projects:
