Garden Cart Assembly Directions!
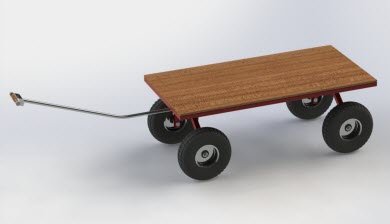
The garden cart assembly directions below are to be used in conjunction with the garden cart plans. Let us know if you would like them.
Machinery and Tools You'll Need To Build The Garden Cart:
1. Chop saw or Angle grinder;
2. Jig saw;
3. Drill press;
4. MIG, TIG or Arc Welding;
5. Hand bending machine for home use;
6. Fitter’s vise;
7. Hammer, wrench set and tape measure;
8. Drill set – 0.5’’ - 1.5’’;
Garden Cart Build Materials List:
1. Mild steel square tube – 1.125’’ X 1.125’’ X 0.075’’ (17 ft); 1.25’’X 1.25’’ X 0.075’’ (5 ft).
2. Mild steel sheet – 0.25’’ thickness (8.5 in2); 0.1495’’ thickness (55 in2); 0.1046’’ thickness (45 in2).
3. Pipe – 1.5’’ outer / 1.2’’ inner X 1.75’’; 1’’ outer / 0.85 inner X 2.5’’; 0.8’’outer / 0.59 inner X 44’’.
4. Teflon sheet 0.1’’ (9 in2).
5. Teflon pipe – 1.2’’outer / 1’’ inner X 1.75’’; 0.85’’ outer / 0.625’’ inner X 2.5’’.
6. (1) Wood handle – 0.8’’ X 4.7’’.
7. (4) Axle spindle – according to GC019 drawing.
8. (1) HBOLT 0.625-11x3.5x1.5-S.
9. (1) HBOLT 0.375-16x5.5x1-S.
10. (1) HBOLT 0.5-13x4.5x1.25-S.
11. (2) HNUT 0.625-11-D-S.
12. (1) HNUT 0.375-16-D-S.
13. (1) HNUT 0.5-13-D-S.
14. (5) WASHER FW 0.625.
15. (1) WASHER FW 0.375.
16. (1) WASHER FW 1.
17. (1) Clevis pin 1’’ X 2.4’’.
18. (5) Retaining splint 0.125’’ X 1.25’’.
19. (4) Wheels – 13’’ X 5.00’’ X 6’’.
20. Plywood (9 ft2).
21. (8) Self tapping screws #7.
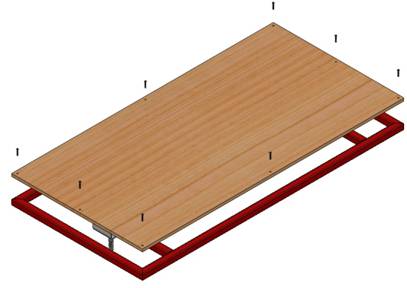
1. Assembling The Platform.
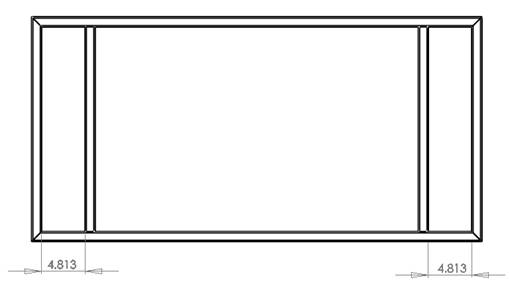
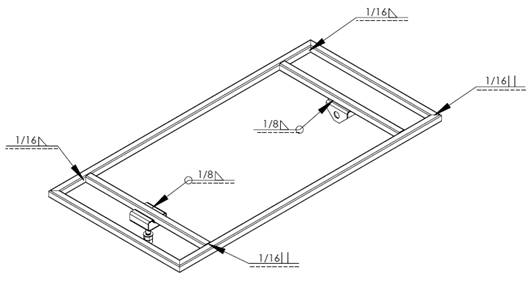 Fig. 1.1 Platform welding plan.
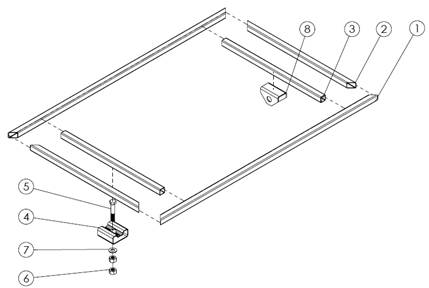 Fig. 1.2 Platform montage plan.
Platform Parts:
1. Length element (gc001).
2. Width element (gc002).
3. Crossbeam (gc009).
4. Front axle pin fixture (gc013).
5. HBOLT 0.625-11x3.5x1.5.
6. HNUT 0.625-11-D.
7. WASHER FW 0.625.
8. Rear axle joint support (gc024).
Step 1: Cut
2 pieces of part numbers gc001 and gc002 and shape the ends at 45
degrees. Align them as shown on figure and weld them together according
to the welding plan (Fig. 1.1).
Step 2: Cut 2 pieces of part number gc009. Align them as shown on figure and weld them together according to the welding plan (Fig. 1.1).
Step 3: Cut part number gc013 with dimensions shown on next figure. Drill the hole 0.6’’. Start bending inwards according to the guidelines (the dotted lines).
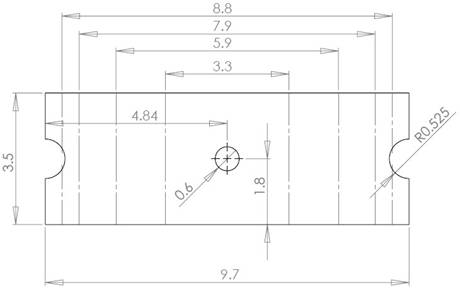
Step 4: Cut part number gc024 with dimensions shown on next figure. Bend according to the guidelines (the dotted lines). NOTE: Drill the holes 1’’ simultaneously after bending, so they will be aligned.

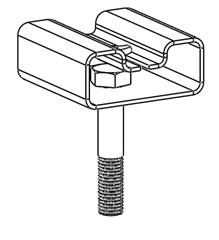
Step 5: Put the 0.625 Bolt in the hole of part gc013 as shown on the figure.
Step 6: Weld part numbers gc013 and gc024 to the frame according to the welding plan (Fig. 1.1). Check that they are aligned exactly in the middle of the crossbeam.
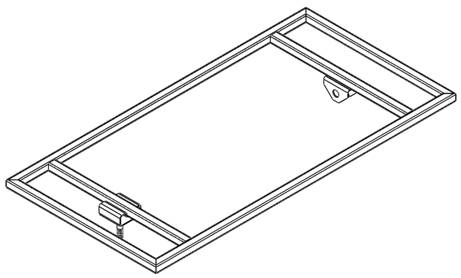
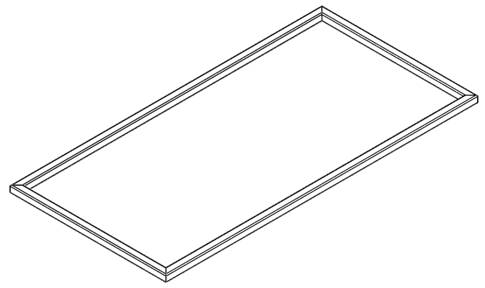
Step 7: Paint the frame in the color you like. Protect the Front axle pin fixture and Rear axle joint support from paint. Mount the Plywood platform gc027 to the frame using at least 8 self tapping screws #7, or you can do it later.
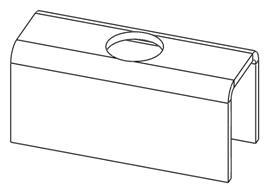
2. Assembling The Garden Cart Front Axle.
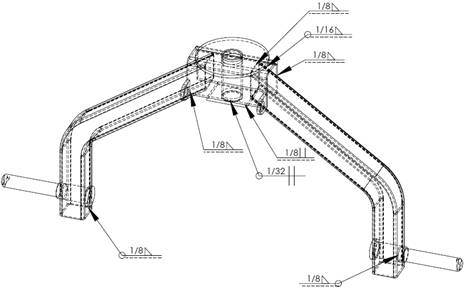 Fig. 2.1 Front axle welding plan.
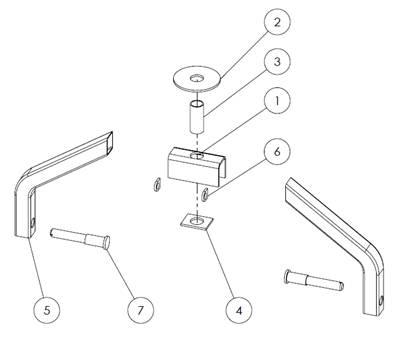 Fig. 2.2 Front axle montage plan.
Front Axle Parts:
1. Front axle element (gc006).
2. Turntable (gc008).
3. Front axle guide (gc010).
4. Plate (gc007).
5. Front axle element (gc005).
6. Handle fixture (gc014).
7. Axle spindle (gc019).
Step 1:
Cut 2 pieces of part number gc005 Front axle element from square tube
rod (NOTE: You have to cut at least 13’’ long piece to comply the final
dimensions). Bend profile, drill the hole and form the corners
according to plan gc005. Put the axle spindle in its place as shown on
the figure and weld the parts observing the welding plan (Fig. 2.1).
Step 2: Cut part number gc006 Front axle element from sheet metal
with dimensions shown on the next figure. Bend the profile according to
guidelines (NOTE: You should keep the inner dimension 1.251’’, so you
will be able to put the square tube in its place). Drill the hole 1’’
according to plan gc006.
 |
 |
Step 3: Cut part numbers gc007 and gc010 and weld them together according to the welding plan (Fig. 2.1).
Step 4: Check the alignment and dimensions in plan gc200, position the parts from Step 1, Step 2 and Step 3. Weld them together observing the plans on Fig. 2.1 and 2.2.
Step 5: Cut the part numbers gc008 and gc014 and weld them together. After completing the Steps 1-5 you have to get the assembly shown on the next picture. Paint in color you like. Protect the axles and fixing elements from paint.
3. Assemble The Rear Garden Cart Axle.
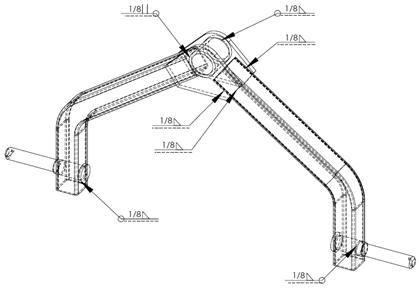 Fig. 3.1 Rear axle welding plan.
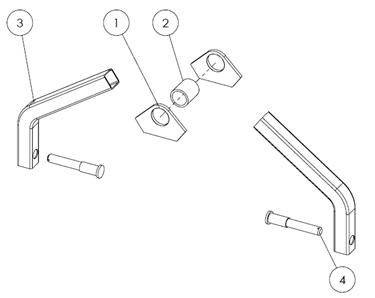 Fig. 3.2 Rear axle montage plan,
Rear Axle Parts For The Garden Cart Build:
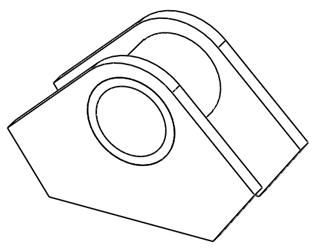
1. Rear axle fixing plate (gc004).
2. Rear axle joint (gc022).
3. Rear axle element (gc003).
4. Axle spindle (gc019).
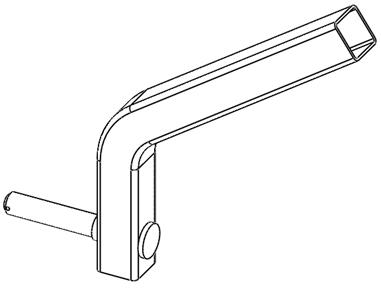
Step 1:
Cut 2 pieces of part number gc003 Rear axle element from square tube
rod (NOTE: You have to cut at least 13’’ long piece to comply the final
dimensions). Bend profile and drill the hole according to plan gc003.
Put the axle spindle in its place as shown on the figure and weld the
parts observing the welding plan (Fig. 3.1).
Step 2: Cut 2 pieces of part numbers gc004 from sheet metal and
one piece of gc022. Weld them together according to the welding and
montage plans (Fig. 3.1-2).
Step 3: Check the alignment and dimensions in plan gc300, position the parts from Step 1 and Step 2. Weld them together observing the plans on Fig. 3.1 and 3.2. After completing the Steps 1-3 you have to get the assembly shown on the next picture. Paint in color you like. Protect the axles and fixing elements from paint.
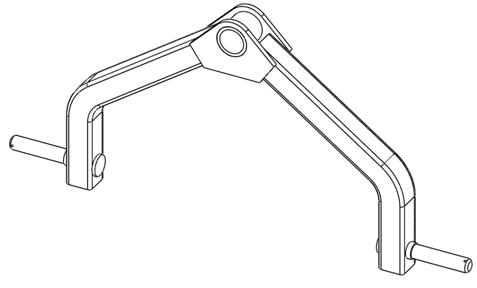
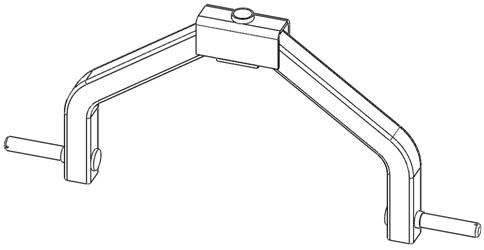
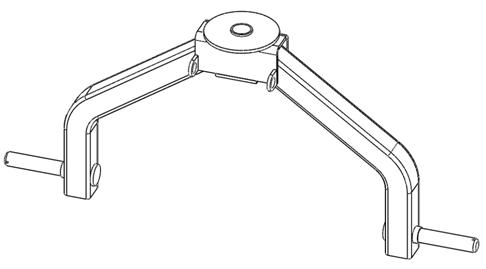
4. Assemble The Garden Cart Handle:
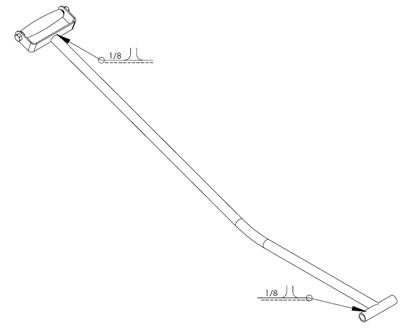 Fig. 4.1 Handle welding plan.
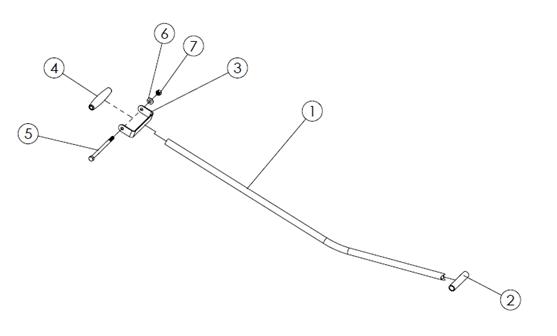 Fig. 4.2 Handle montage plan.
Garden Cart Handle Parts:
1. Handle long pipe (gc016).
2. Handle pipe (gc015).
3. Handle support (gc017).
4. Handle (gc018).
5. HBOLT 0.375-16x5.5x1.
6. WASHER FW 0.375.
7. HNUT 0.375-16-D.
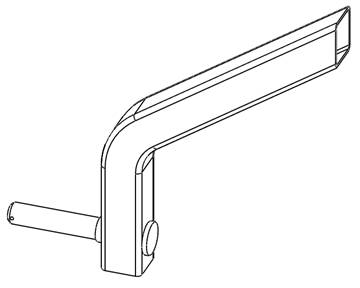
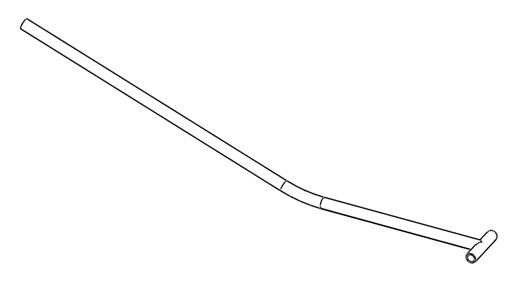
Step 1: Cut
part numbers gc015 and gc016. Form the Handle long pipe according to
the plan. Weld the Handle long pipe 1 and Handle pipe 2 according to
welding plan (Fig. 1).
NOTE: If you wish to keep the dimensions after bending, cut 3.35 ft long pipe.
Step 2: Cut the Handle support sheet metal as shown on Fig. 4.3, drill the holes and form the part according to plan gc017.

Weld the Handle long pipe 1 to Handle support 3 according to welding plan (Fig. 1). The Handle pipe and handle support must be parallel aligned. Paint in color you like.
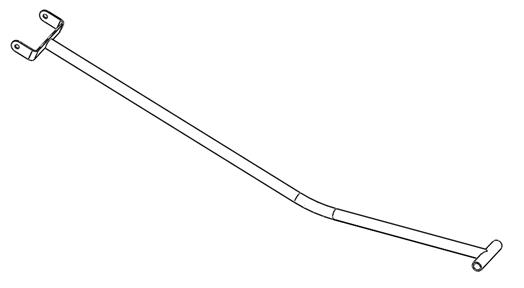
Step 3: Mount the Handle 4 using the Bolt, Washer and Nut, 5-6-7 respectively as shown on Fig. 4.2.
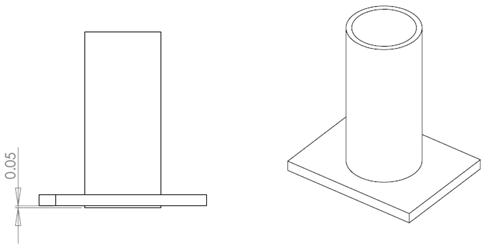
5. Assemble The Entire Garden Cart.
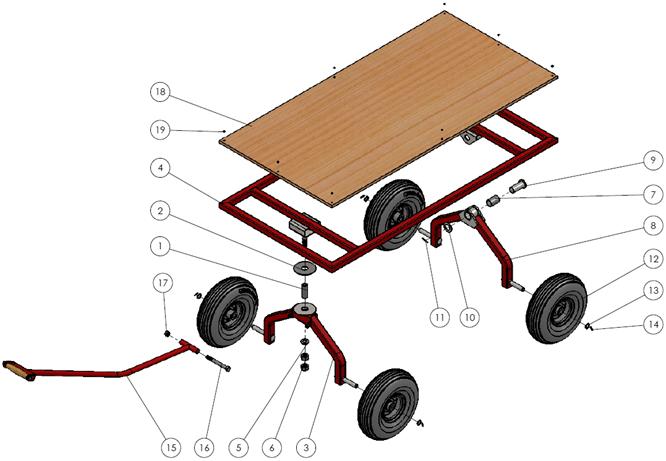 Fig. 5.1 Garden cart montage plan.
Garden Cart Parts For Assembly:
1. Plastic bushing (gc011).
2. Friction plate (gc012).
3. Front axle assembly (gc200).
4. Platform assembly (gc100).
5. WASHER FW 0.625.
6. HNUT 0.625-11-D.
7. Bushing (gc023).
8. Rear axle assembly (gc300).
9. Rear axle pin (gc025).
10. WASHER FW 1.
11. Retaining splint (gc021).
12. Wheel – 13’’ X 5.00’’ X 6’’.
13. WASHER FW 0.625.
14. Retaining splint (gc021).
15. Handle assembly.
16. HBOLT 0.375-16x5.5x1.
17. HNUT 0.375-16-D.
18. Plywood platform (gc027).
19. Self tapping screws #7.
Step 1:
Put the Plastic bushing (1) and Friction plate (2) in its place at
Front axle assembly (see Fig. 5.1). Connect Front axle assembly (3) and
Platform assembly (4) using the Washer (5) and Nuts (6).
NOTE: Don’t tight the first nut, just skim the gap and then tight the second nut.
Step 2: Put the Bushing (7) in its place at Rear axle assembly (8). Connect Rear axle assembly with Platform assembly (4) using the Pin (9). Thread the Washer (10) and Retaining splint (11) to the Pin (9).
Step 3: Put the Wheels (12) in its place at Axle spindles. Thread the Washers (13) and Retaining splints (14).
Step 4: Put the Handle assembly (15) in its place at Front axle assembly (3). Thread the Bolt (16) and screw the Nut (17), tight slightly, so the handle have to be movable.
Step 5: Place the Plywood platform (18) on the top of the platform and screw the Self tapping screws.
Congratulations!
You now have fully working and comfortable to use Garden Cart!


Welding Plans:

New! Welding Table
New! Log Splitter
Top Projects:
