DIY Bench Top Tubing Bender!

This tubing bender is a really good project. It's a hand tool and it's fairly easy to fabricate and assemble. Follow the directions below and you'll get it done in no time. The plans for this bender are here and they are recommended for the build.
If you want a bench top bender then this is ideal. If you want to put this bender on a stand then you'll be glad to know there is a simple and detailed tutorial on how to build it.
Features:
- Pipe size 1 1⁄4”.
- Possibility to increase pipe size up to 1 1⁄2’’ - Bending angle 180 degrees.
- Bending angle measuring at 22.50.
- Easy set up for different bending angles.
- You can bend square tubing on this bender. The die and guiding wheel must be removed for bending square tubing. The bending radius will be the radius of the pin plus half the size of the square tube. For bigger bending radius a bushing can be used in place of the die.
Tools and Machines Required To Build The Bender:
1. Lathe.
2. Drill press.
3. MIG, TIG or Arc Welding.
4. Chop saw or Angle grinder.
5. Fitter’s vise.
6. Hammer, wrench set and caliper.
7. Drill set.
Bench Top Tubing Bender Materials List:
1. Mild steel sheet – 0.5’’ thickness (360 in2).
2. Mild steel square bar – 21⁄2’’ X 3’’ (3.5 in).
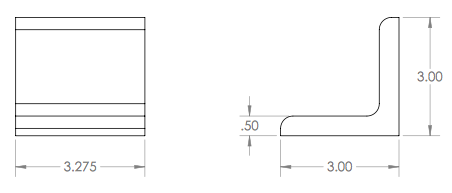
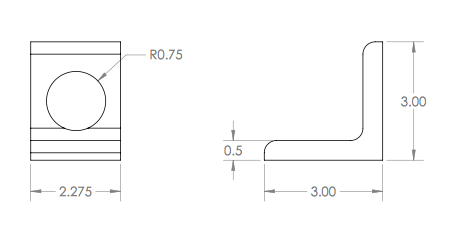
3. 10’’ round bar (3 in); 5’’ round bar (2.5 in); 1’’ round bar (1.5 in). 4. L profile L3x3x0.5x3.275 (12 in).
5. C channel 3x1.5x20 (40 in).
Parts List:
1. 1.5’’ ERW tubing (20 in).
2. Spacer – 7/8’’ screw size, L=3.275’’.
3. (2) HBOLT 0.8750-9x5.75x2-S.
4. (1) RHBOLT 0.75-10x2x1.75-S.
5. (2) HNUT 0.8750-9-D-S.
6. (1) HNUT 0.7500-10-D-S.
7. (4) Washer FW 0.875.
8. (2) Washer FW 0.75.
9. (2) Quick-release pin 1 X 5’’.
10. (1) Quick-release pin 1 X 3.75’’.
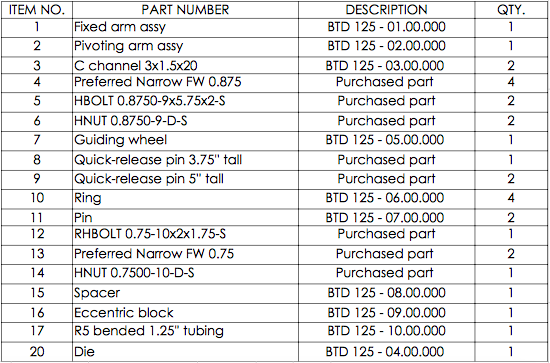 Bender parts chart.
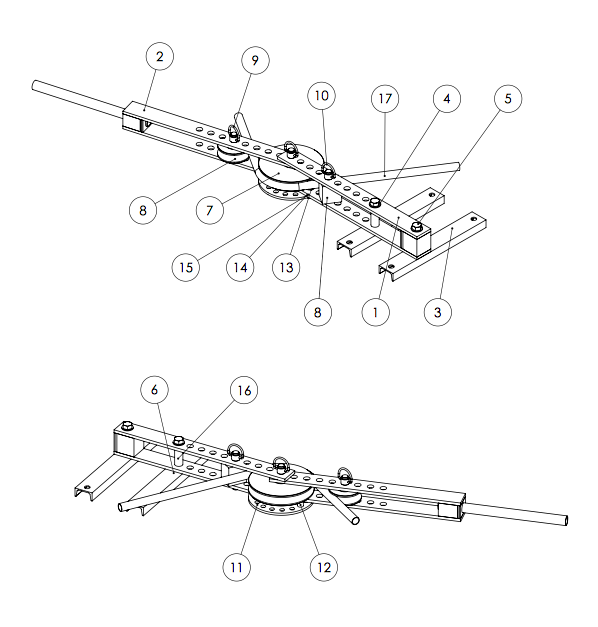
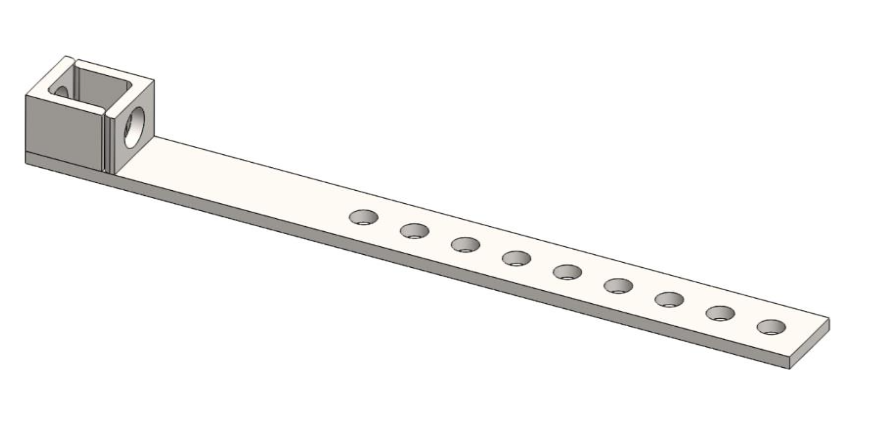
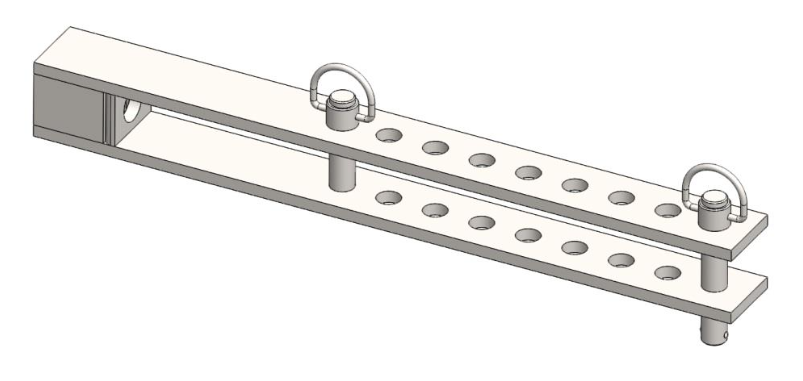
1. Tubing Bender Fixed Arm Assembly:


Parts:
1. Fixed arm (BTBD125 - 01.00.100).
2. L profile L3x3x0.5x3.275 (BTD 125 - 01.00.200).
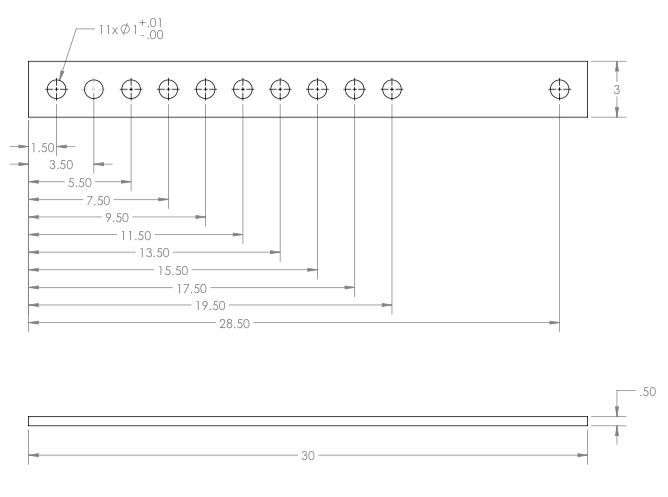
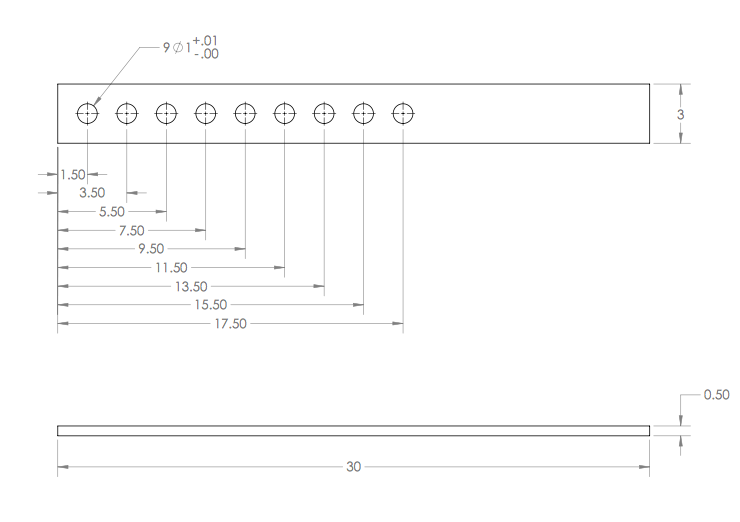
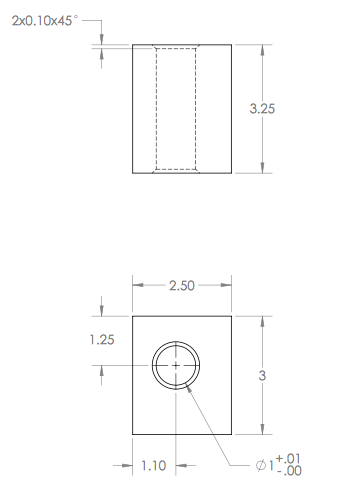
Step 1: Cut two 3x30’’ work pieces of 0.5’’ thick mild steel sheet. Drill the 1’’ holes according to drawing BTBD125 - 01.00.100 or as shown below:
Step 2: Cut two 3.275’’ long pieces of 3x3’’ L profile according to drawing BTBD125 - 01.00.200. Align them as shown on the next picture to get a small box. See section view and dimensioning on drawing. Complete both square welds according to the welding plan (Fig. 1.1).

Step 3: Place Fixed arm on a flat working surface. Align the box over it according to montage plan (Fig. 1.2) and tack weld in place.
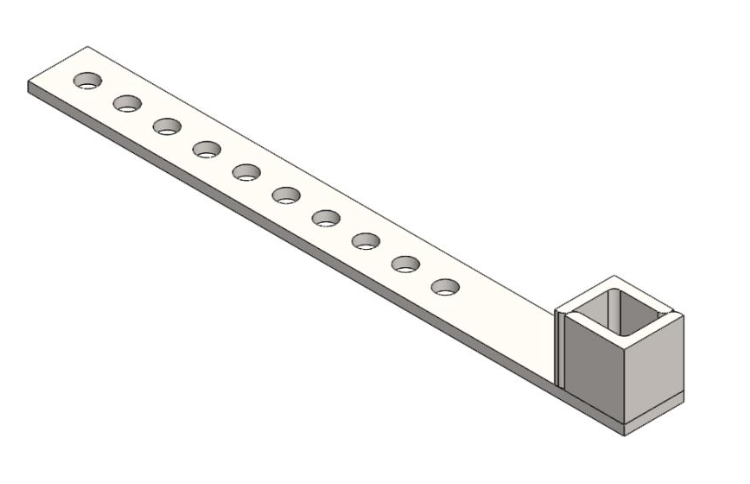
Step 4: Position the second Fixed arm over the box. Use at least one of the Quick-release pins and a bolt to ensure the alignment of the holes. Complete the welds observing the welding plan.
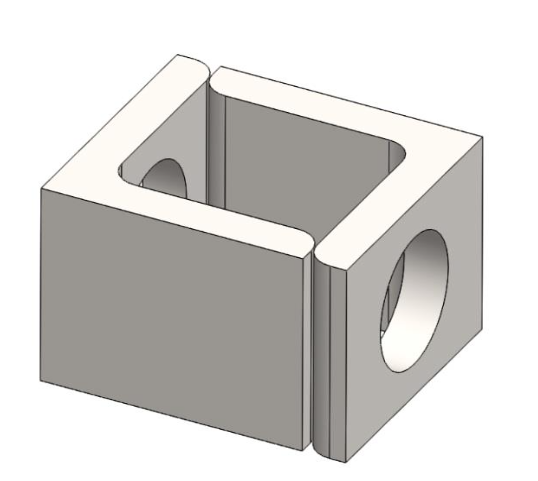
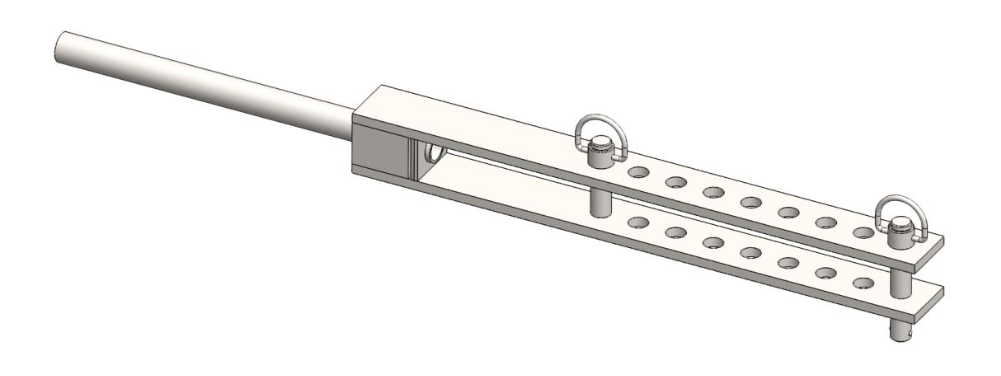
2. Tubing Bender Pivoting Arm Assembly:


Parts:
1. Pivoting arm (BTD 125 - 02.00.100).
2. Pivoting arm box L3x3x0.5x2.275 (BTD 125 - 02.00.200).
3. Handle tube.
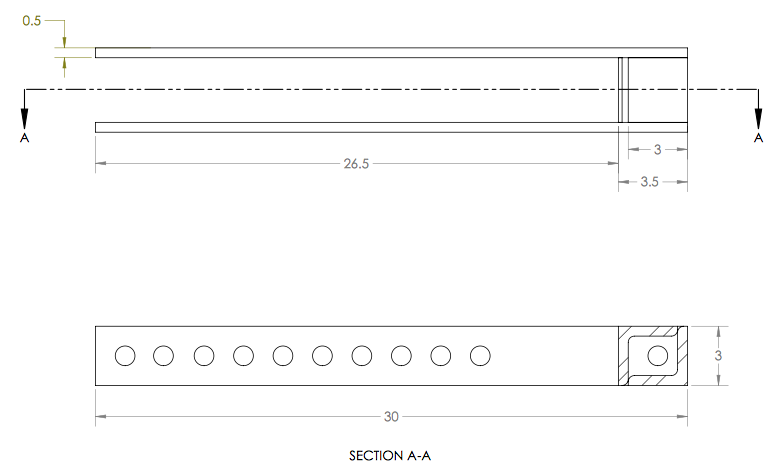
Step 1: Cut two 3x30’’ work pieces of 0.5’’ thick mild steel sheet and drill the holes according to drawing BTBD125 - 02.00.100.
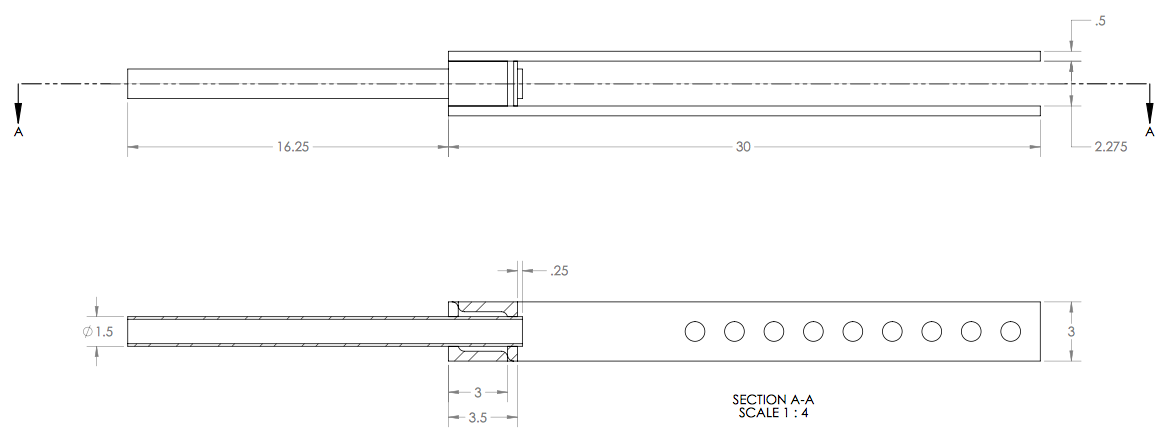
Step 2: Cut two 2.275’’ long pieces of 3x3’’ L profile. Drill the 1.5’’ holes for the handle tube observing the drawing BTBD125 - 02.00.200. Align them as shown on the next picture to get a small box. See section view and dimensioning on drawing. Complete both square welds according to the welding plan (Fig. 2.1).
Step 3: Place Pivoting arm on a flat working surface. Align the box over it according to montage plan (Fig. 2.2) and tack weld in place.
Step 4: Position the second Pivoting arm over the box. Use two Quick-release pins to ensure the alignment of the holes. Tack weld them in place and complete the welds.
Step 5: Thread the handle tube through the holes of the box, leaving a 0.25’’ clearance between the L profile and end of the tube. Use this clearance for the fillet weld.
Guiding Wheel, Die, and Ring For The Bender:


Pin, Spacer, and Eccentric Block:

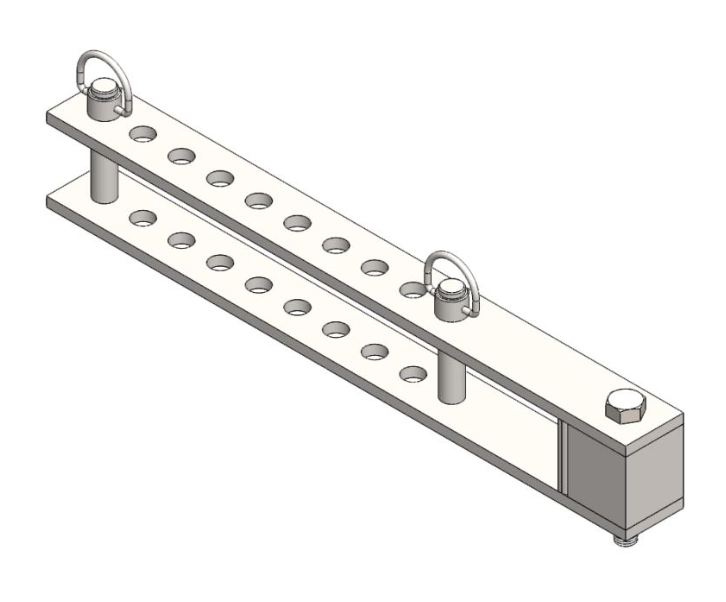
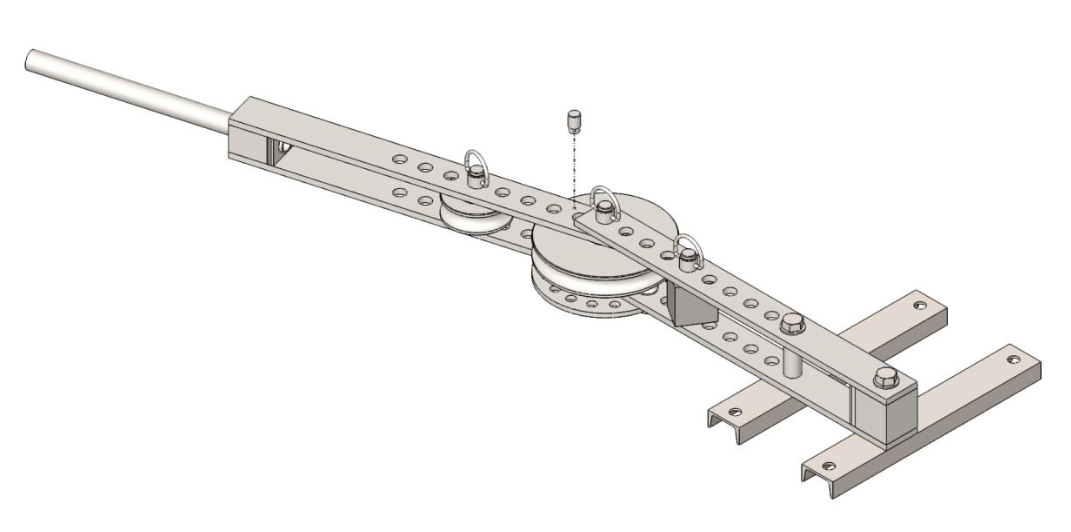
3. Complete Bench Top Tubing Bender Assembly:

Parts:
1. Fixed arm assy (BTBD125 - 01.00.000). 2. Spacer (BTD 125 - 08.00.000).
3. Washer FW 0.875.
4. HBOLT (0.8750-9x5.75x2-S).
5. C channel 3x1.5x20 (BTD 125 - 03.00.000). 6. HNUT 0.8750-9-D-S.
7. Ring (BTD 125 - 06.00.000).
8. Washer FW 0.75.
9. RHBOLT 0.75-10x2x1.75-S.
10. HNUT 0.7500-10-D-S.
11. Pin (BTD 125 - 07.00.000).
12. Pivoting arm assy (BTD 125 - 02.00.000).
13. Die (BTD 125 - 04.00.000).
14. Quick-release pin 5'' tall.
15. Eccentric block (BTD 125 - 09.00.000). 16. Guiding wheel (BTD 125 - 05.00.000). 17. Quick-release pin 3.75'' tall.
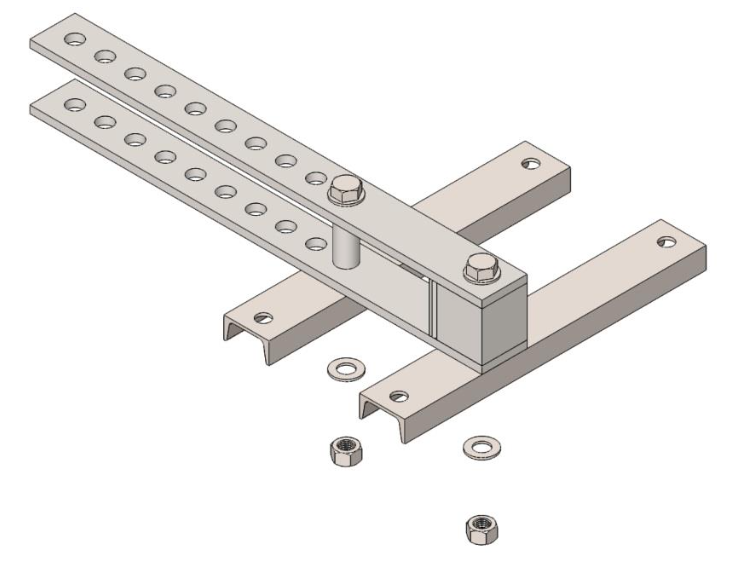
Step 1: Place the Fixed arm assy (1) on a flat working surface and position the Spacer (2) concentric to the last hole as shown on the next picture. Thread the 0.875’’ bolts (4) through the Washers (3) and holes in the fixed arm.
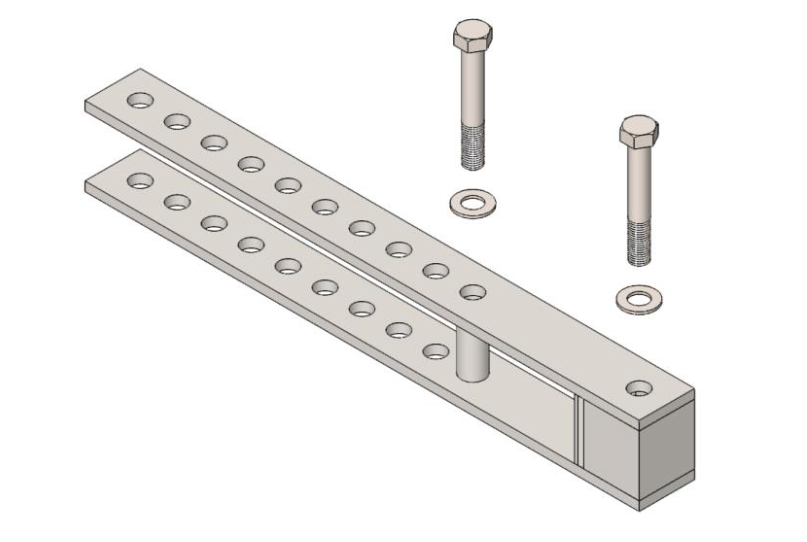
Step 2: Cut two 20’’ long pieces of 1.5x3’’ C channel. Drill the holes according to the drawing. Attach the C channels (5) to the Fixed arm using the bolts (4), Washers (3) and Nuts (6).

Step 3: Mount the Ring (7) to the bottom side of the Fixed arm using the Round head bolt (9), Washers (8) and Nut (10). See montage plan (Fig. 3.1).
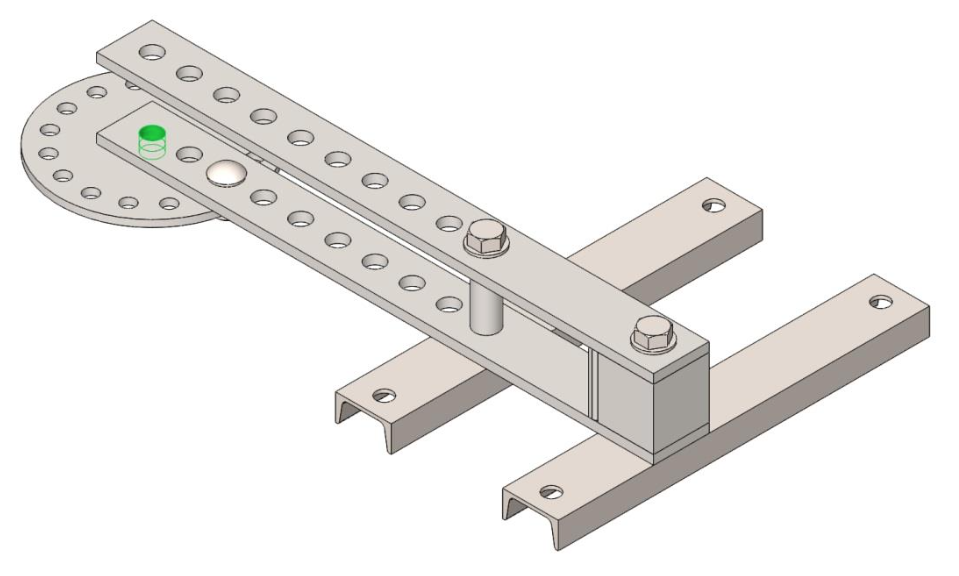
Step 4: Cut a 2.5’’ piece of 10’’ round bar. Machine according to dimensions on drawing BTBD125 - 04.00.000. Position the last outer hole of the Pivoting arm (12) concentric to the outer hole of the Fixed arm (1) and Die (13). Lock with Quick- release pin (14) and mount the Guiding wheel (16) using the short Quick-release pin (17).
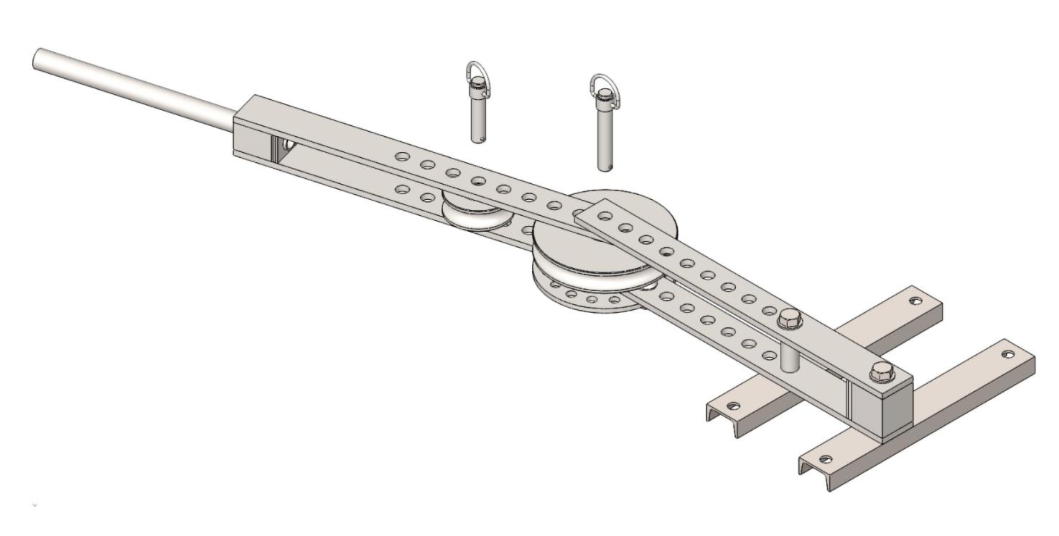
Step 5: Cut 3.5’’ long piece of 2.5x3’’ block. Machine to overall size and drill the hole according to drawing BTBD125 - 09.00.000. Mount the block using Quick-release pin (14).
Step 6: Use the pin (11) for setting the bending angle.
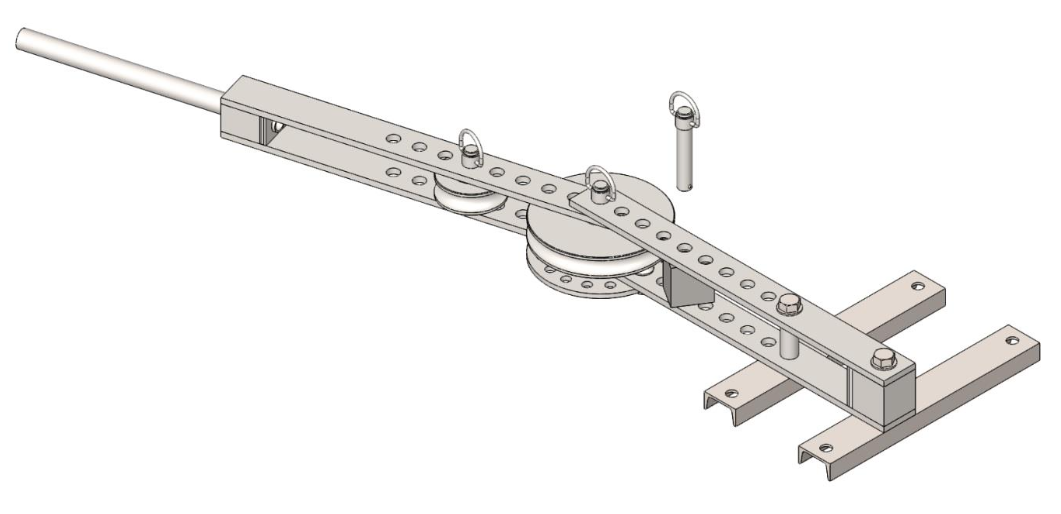
Congratulations!
You finished assembling the tubing bender!
Note: If there are any parts you want to see please contact us or get the detailed plans in PDF formate here.


Welding Plans:

New! Welding Table
New! Log Splitter
Top Projects:
