Build A Tomato Cage In No Time!

This guide on how to build a tomato cage will show you how to bend the wire using a homemade jig, and then where to make the welds.
This project is a great metalwork exercise in many ways because you learn how build jigs, bend wire, and make welds all in one simple project.
And if building a tomato cage is not for you, it will make your wife excited about your welding hobby for sure because when you give ther these cages for her garden she'll be ecstatic!
What You'll Need To Build A Tomato Cage:
- 30 feet .25 inch diameter mild steel rod.
- .5 inch plywood, particle board, MDF, or something along those lines. At least 18 inches x 48 inches.
- 3 1 inch 2 inch x 3 inch blocks of wood.


20 Steps To Fabricating A Tomato Cage!
The best way to build a tomato cage is to build a simple bending jig first. Because you need to have the right wire bends and hoops prior to welding them together. Once your jigs are made you are ready to make tomato cages by the dozens if needed.
Also, you can get a one page pdf of the weldments here. Or you can get a 14 page pdf that has much more detail on everything including the blue prints here.
How To Make A Bending Jig For Tomato Wire:
Step 1: Cut two half circles from the ½” x 18” x 48” wood board. One 5 7/8” radius, the other 5 3/8” radius.
Step 2: Attach each half circle to a 15” x 36” wood board, approximately in the center of the board and approximately 3” from the end of the board. The flat portion of the half circles should be parallel to the end of the board, as shown below.
Step 3: Attach the wood blocks to the board as shown. They should centered on the half circles and located ¼” from the top edge of the half circle. The blocks should also be perpendicular to the flat of the half circle.
Step 4: Mark the center of each half circle as show below.

A: Center Mark.
B: Half Circle With Center Mark.
C: 24” x 36” Wood board
D: 1” x 2” x 3” block
Step 5: Cut an 11 ¼” diameter circle from the 18” x 48” wood board.
Step 6: Attach the circle to the reverse side of the 18” x 36” board. The circle should be located approximately in the middle of the board, as show below.
Step 7: Attach a 1” x 2” x 3” block to the same side of the board as the circle. It should be located ¼” from the circle with one end inline with the center of the circle as shown below.

Secure the bend jig to a work bench or the floor of your work area.
Printed with.
Step 8: Referring to drawing WP-901, cut the 1/4” rod material for the long and short cage hoops - part numbersWP-901-1 and WP-90102.
DO NOT CUT THE MATERIAL FOR THE CAGE RINGS, YET.
Step 9: Mark the center on each of the cage hoop pieces.
Step 10: Place a cage hoop on the bending jig and line up the mark on the steel rod with the center mark on the half circle.

Step 11: While holding the steel rod on both sides of the center mark, pull or wrap the steel rod around the half circle until a 180 degree hoop is formed. The legs of the tomato cage hoop should be equal length and parallel to each other.

Step 12: Two cage hoops will be formed. One will be bent around the larger half circle and the other will be bent around the smaller half circle bending block.

Step 13: Using the opposite side of the bending jig (the circle side), place a length of steel rod in the bending jig. The end of the rod should be approximately 2-3” past the centerline of the circle as shown below.

Step 14: Wrap the steel rod completely around the circle forming block. Continue bending the rod beyond the centerline of the circle to account for the spring back in the material.
Step 15: Trim the bent ring so the ends of the ring touch, or are within 1/16” of each other.

Step 16: Position the two cage hoops together; one over the other and 90 degrees apart as shown on the WP-901 drawing.
Step 17: Weld the two hoops together where they touch at the top using a “J-groove” weld in four places; two welds at the top of the cage hoops and two welds on the underside of the cage hoops (90 degrees to the top welds).
Step 18: Weld the ends of the cage rings together; all the way around.
Step 19: Weld the cage rings to the cage hoops as shown on the WP-901 drawing. Note that the rings will be positioned around the outside of the legs of the tallest hoop, and around the inside of the legs of the shortest hoop.
Step 20: Paint the welded tomato cage for rust prevention.
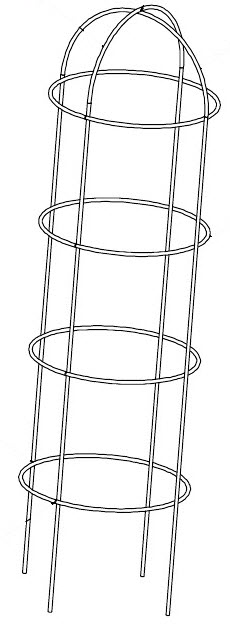
Completed Tomato Cage!
If you liked this tutorial on how to build a tomato cage then you are going to love our newsletter and other guides. Get on our list now. It's free and the information is of the highest quality.
Copyright WcWelding.com All Rights Reserved.


Welding Plans:

New! Welding Table
New! Log Splitter
Top Projects:
