Build An Old Fashioned Reading Lamp In 16 Steps!
In constructing this old fashioned reading lamp, convenience, attractiveness, simplicity, and usefulness are taken into consideration. It is an interesting project in art metal, and may be made with but few tools.
The base A is a cross-lap joint, held together by two rivets, spaced diagonally. The ends of the members A are curved in scroll shape, as shown in the drawing. Each of the two uprights B is fastened to the base by two rivets, and is given a half-turn twist in two places.
Above the upper twist, the two uprights are swung out into an arc to make room for the lamp shade. As shown in the drawing, they are brought together and riveted in three places. At D, the two pieces are twisted a quarter turn, and are separated to admit the ends of the clamp C between them.
A hole is drilled through the four thicknesses of metal for a small bolt with a wing nut, so that the shade may be swung and set to any desired angle. The clamp C surrounds the bulb socket, and supports the shade
by connecting strips.
Side Bar: This guide is from '101 Metalworking Projects' which is highly recommended for any welder or metalworker.
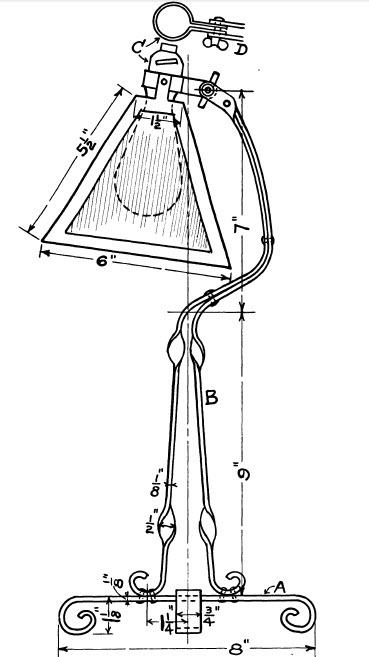
The shade is formed from flat sheet metal by drawing an outer circle with a 7-in. radius, and an inner circle with a l 3/4 in. radius. On the outer circle, mark off 6 in. four times, and connect each point with the center by a line; also, join the points on the outer and the inner circles by lines.
When cutting off metal for the bulb-socket opening, allow 1/2 in. radial strips, 3/4 in. long, which are to be riveted to clamp C. If it is desired to embellish the lamp with art glass, patterns of different outlines may be designed and cut in paper for light openings in the shade, and the best one selected.
- Object of Lesson: Making volute curve; twisting; bending and riveting; laying out, and making shade.
- Tools and Equipment: Vise; monkey wrench; hack saw; drill; file; snips; cold chisel; hammer.
- Materials Required: For the base, 1 piece of 1/8 by 3/4 in. strap iron, 22 in. long; for the upright stem, 1 piece of 1/8 by 1/2 in. strap iron, 40 in. long: for the clamp, 1 piece of 1/16 by 3/16 in. strap iron or brass, 6 in. long; for the lamp shade, 1 piece No. 22 sheet metal, 9 by 14 in.; 3/16 by 3/8 in. iron, and 1/16 by 3/16 in. copper rivets; a 3/32 in. wing nut and a 5/8 in. screw.
16 Steps To Building This Old Fashioned Reading Lamp:
- To make the base, cut each piece 11 in. long. File the ends round.
- Grip the end of the stock in a vise to form a volute curve around a small cylinder.
- Locate and drill two holes diagonally across the middle, and rivet the base pieces together.
- To make the uprights, cut each 20 in. long; round off the lower end and bend the curve. Locate and make the lower and the upper twists, each a half turn in the same direction, but opposite directions for the two pieces. (See drawing.)
- Drill four holes through the base and the curves of the stem pieces, and rivet the base and the standard together.
- Bend the upright pieces together above the upper twist, as shown, and locate, drill, and insert a rivet.
- Bend the stem into a graceful curve, and put in two more rivets. Finish neatly.
- Twist the end of the stem a quarter turn at D, and open the ends to form a cramp on the ends of clamp C. Then cut off the ends even, drill a hole for the bolt, and file the ends semicircular.
- Bend clamp C to fit tightly around the bulb socket and into the hinge at D.
- Saw off the ends, drill a hole for the bolt, and round off the ends. Fit the bolt and wing nut.
- To make the lamp shade, draw two circles on sheet metal; the outer circle should have a 7-in. radius and the inner circle a l 3/4 in. radius.
- On the large circle, mark off four 6-in. spaces, allowing a 1/2 in. lap at one end.
- Draw a line from each mark to the center, transecting the points on both circles.
- Draw 1/2 in. strips to support the shade on clamp C. Draw a 1/2 in. lap, and cut to the lines.
- Bend the shade to shape. Drill holes and rivet together neatly.
- Fit the shade strips on clamp C, so that the shade is square with the stand. Locate and drill holes in the strips and the clamp, and rivet them together. Assemble all parts.
QUESTIONS:
- Why should the base of a lamp be large and heavy?
- What are the advantages of a shade on a lamp?
- How is insufficient light a detriment to eyesight?
- Is the light inadequate because it is too far away?
- How does the strength of light vary with its distance from us?
Copyright WcWelding.com All Rights Reserved.


Welding Plans:

New! Welding Table
New! Log Splitter
Top Projects:
