Overhead Arc Welding Techniques!
This tutorial on overhead arc welding will show you how to weld different joints in this position.
The hardest position to weld in is the overhead position. The reason it is so difficult is because you are dealing with one of most powerful forces in nature: Gravity.
In addition you have to deal with an uncomfortable position. Fortunately with the tips here you will discover that you can make welds just as well in the overhead postion as in flat, horizontal, and vertical.
ATTENTION: Since you will be directly underneath your weld puddle you need to wear appropriate clothing and safety gear. You don't want metal dropping down your collar, or rolling down your sleeves.
Arc Welding Current and Stick Welding Techniques!
The keys to a good weld in the overhead position is to:
- Keep your arc length short.
- Lower amp settings.
As I mentioned earlier, you will discover that the force of gravity will allow the weld puddle to droop down since it's above you.
One of the problems is that globs of metal will drop more from your weld puddle if your arc is long. The reason for this is because the filler metal (from your stick) does not get to the metal you are welding well. That's why we need a shorter arc.
To keep this from happening, or happening as much, you can consistently make the arc shorter and longer because it allows your weld to harden as you weld.
Conversely, if you make a bigger weld pool you will not achieve a good weld and molten filler metal and base metal will sag.
Overhead Arc Welding Techniques!
Stick Welding Weave Beads:
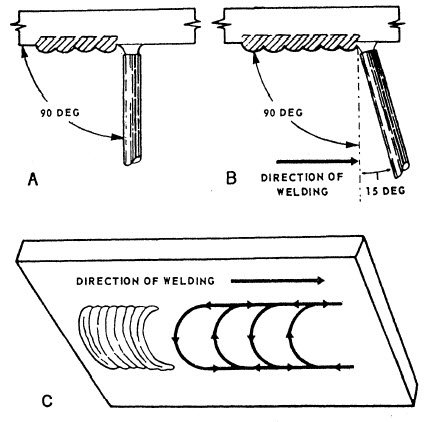
The angle of your welding rod should be at ninety degrees to your workpiece. See the illustration A below.
You will move the electrode at a ten to fifteen degree angle and in the direction of your weld. This is called your 'travel angle'. See illustration B below.
How do you make a weave bead in the overhead arc welding overhead? It's easy once you practice it a bit. What you do is simply weave back and forth as seen in illustration C below. A good technique in this position is to do it faster when you reach the end of your weave, kind of like whipping it. The reason for this faster motion at the end is because you can get better control of your filler material as it is being deposited.
However, do not over do the weaving motion. It may create the filler metal that you deposited to get too hot and then your weld puddle gets too big, and now have a problem.
Butt Joint Welding:
To weld butt joints you should use good preparation of your material and use the same methods as you would as if you were welding in the flat position.
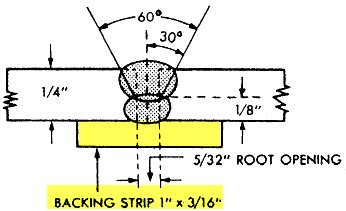
You will find that your welds improve on butt joints when you use a backing strip. Often you will do a burn through without a backing unless you are super good at this technique.
Butt Weld Backing Strip Example .25 Inch Plate In The Flat Position:
Bead welding is best for the overhead arc welding position. When you lay your bead be sure to remove any rough parts of it with a chipper and clean it prior to your next bead.
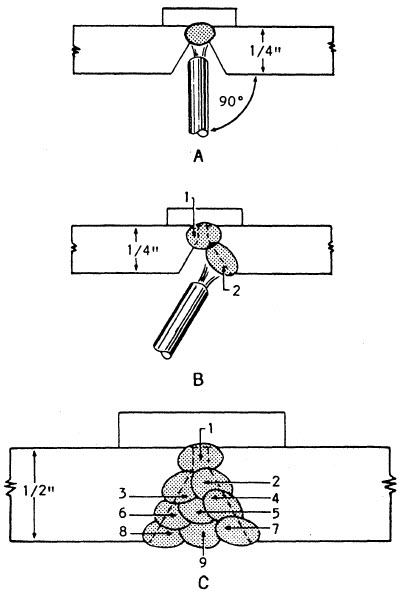
The position of your stick can be viewed in illustration B and C below. These images show the stick angle for laying beads on .25" or .5" metal plate.
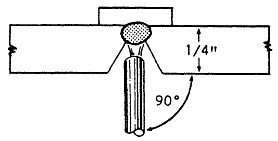
Since root penetration crucial you want to be sure your stick is at a ninety degree angle as seen in illustration A below on your first bead.
You do not want to use a welding rod that is too big for the weld because you won't be able to keep the arc distance short enough.
Note the backing strip on each overhead butt weld...
Overhead Fillet Welding!
Fillet Welds:
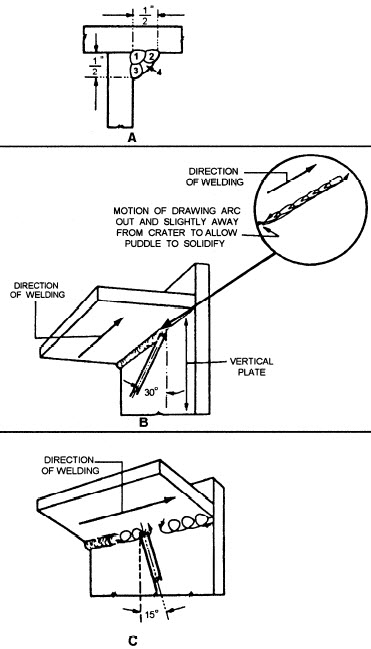
Do not use the weaving technique on lap or tee joints for this position. But you do want to keep your arc at a short distance.
Also, keep your welding rod at around a thirty degree angle to the vertical metal plate and keep your movement uniform as you can see in illustration B below.
To get quality penetration and fusion you must keep good control of your arc as you weld.
You will find that the filler material and base material will sag as they become molten so another good technique for this joint is to use a whipping motion away from the crater of the welding puddle but in front of the actual weld. Why? Because this will make the arc distance longer which gives the molten metal time to harden. This will give you good control of your weld in this position and on this joint.
But you must bring the welding rod right back to the welding puddle crater and keep on welding.
If you are welding these joints on heavy material you will have to use several layers of welds. This is called 'multi pass' welding. You can see this in illustration A below.
The first bead here is made without using a weaving technique and this type of bead is called a string bead (a string bead is created when you weld without using a weaving pattern).
As you can see in illustration C below you need to angle your welding rod at approximately fifteen degrees as you weld. But use a circular welding technique on the other passes in the overhead arc welding position. You will find that this circular motion will give you better control of the weld.
After every bead you will clean the slag and other material off of your weld using a wire brush and or chipping hammer prior to any other welds.
Welding Plans:
New! Welding Table
New! Log Splitter
Top Projects:
