Metal Shelving Plans Welding Project!
This metal shelving plans project is a real beginner's welding project but is one many enjoy as they will physically have something they can use in their garage or workshop once complete. This is a metal shelving welding project.
The metal shelving welding plans project is a great way to develop low cost and durable metal shelves for your garage or workshop that are built to your own specifications. These shelves are heavy duty and are perfect for storing your tools, paint, small metal pieces and pretty much anything else you can think of . Many feel a sense of pride from walking into their workshop and being able to say they built the fittings inside, especially when they are beginners to welding.
Below you will find the requirements and step by step guide on the metal shelving plans welding project.
Metal Shelving Welding Project:
Below are the tools and materials required to carry out your metal shelving plans welding project, without these the project cannot be completed:
- Mig Welder
- Tape Measure
- 2.54 Angle Iron
- High gauge (thin) metal sheet
- Drill and selection of drill bits
- Metal bender
- Guillotine or bench shear
- Steel cutting circular saw
- Metal scribe
Right time to get on to the important part where you can actually build your own metal shelving welding project and have the satisfaction of building your own shelves:
- Take a tape measure and measure the length and width you require for your shelves, for this project we are using the following measurements: Length 1000 mm and width 400 mm.
- Take your metal sheet and measure out the measurements of your length and width, and then add an extra 50 mm on each. This will mean we have marked out 1050 mm by 450 mm on the metal sheet.
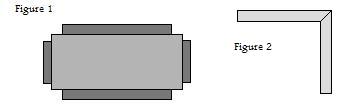
- Cut out your marked area from the metal sheet, now at each corner cut a 50 mm by 50 mm square out (see figure 1)
- Using your metal bender, bend the flaps on each side of your metal sheet to 90 degrees in the same direction.
- Using the Mig Welder, weld the corners of the flaps together and you should now have a shelf without brackets.
- To make the brackets for your shelves take your angle iron and cut four pieces, all to the initial width of your shelf minus 50 mm. For this project this is the initial 400 mm minus 50 mm so gives us 350 mm.
- On one end of each piece of angle iron cut to a 45 degree angle on one side, this will now mean two pieces (2 x 2) should fit together comfortably and can be welded so you have two bracket (see figure 2)
- You need to review your brackets against your shelf then mark out two points on each bracket on the bracket angle being attached to the wall. One of the marks should be 50 mm from the top and one 50 mm from the bottom using your scribe.
- Take your drill and drill holes in the four marks made (2 on each brackets)
- Now simply weld your brackets to the underside of your shelf at 75 mm from the outside edge
- You should now have a metal shelf as show below.
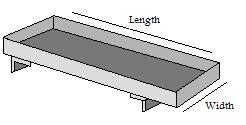
Supporting figures from step 3 and step 7:
You should now have a sturdy and durable shelf to put in your workshop or garage, you simply need to repeat all steps to create multiple shelves. You have now completed the metal shelving plans welding project.
Side note:
When attaching the shelves to the wall ensure you drill a hole using a drill bit the same size as your wall plugs (wall plugs are extremely important). This will mean you can ensure that your great shelves will be kept in place and will not fall away from the wall when weight is added.


Welding Plans:

New! Welding Table
New! Log Splitter
Top Projects:
