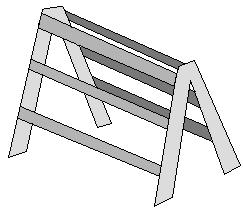
Weights Rack Project!
This weights rack project is a beginners welding project and is perfect for those that love going to the gym but likewise enjoy welding too. Why pay for a weight lifting rack when you can have the pride and enjoyment of building one with your very own fair hands.
The rack welding project is the perfect way for budding welders who love to use a home gym the perfect opportunity to marry their favorite hobbies and save some money in the same breath. By carrying out this project you will be able to think about your welding prowess whilst lifting weights in your home gym.
Below are the materials, tools and step by step details needed to build your own weights rack for this welding project.
Weight Lifting Rack (Gym) Welding Idea:
For you to carry out this project you will require all the materials and tools mentioned below, without these the project cannot be completed.
- Mig Welder
- Tape Measure
- 25.4 mm Angle Iron
- 25.4 mm Box section
- Angle Grinder
- Steel cutting circular saw
- Metal scribe
Now you have everything you need you are in a position to start building your rack. This is going to be one of your favorite welding projects of all time because you will have your very own weights rack.
- Take a tape measure and measure the length you require for your weight lifting rack, the reason for this is that you may wish for a rack for dumbbells or for barbells. For an example we are using the length 700 mm. Height we will use 1000 mm.
- Take your box section and cut 4 pieces at 1000 mm, now cut two pieces at 75mm.
- You need the box section to form an upside down v shape so now cut both ends of your 4 pieces of 1000 mm at 45 degrees.
- Weld a 1000 mm of box section on either end of your short 75 mm box section pieces to form your two V shapes.
- Cut 6 lengths of angle iron at 700 mm each.
- Weld 3 lengths of angle iron on each side of one v shape of box section, these should be at intervals of 300 mm from the bottom.
- Now put the second box section V shape on the other end of the weights rack and weld the angle iron at the same measurements as previous.
- Using the angle grinder to sand down the welds on your rack.
- Now you need to spray paint or simply paint it any color you wish, this will protect the weights rack from the wear and tear of picking up and dropping weights on the rack.
You should now have a metal weight lifting rack as show below.

You will not have a brilliant weight lifting rack to put all your barbells or dumbbells on, dependent on which weight rack you went on to build as per the outline in step 1. This is the perfect way to keep you home gym clean and tidy while also giving it a more professional gym feel.
Welding Plans:
New! Welding Table
New! Log Splitter
Top Projects:


